Configuration Server also allows you to perform advanced features outside of the day-to-day functionality. Keep reading to learn about the additional features and functionality Configuration Server has for you to configure, customize, and modify your instance.
CTI Agents
Advanced Search
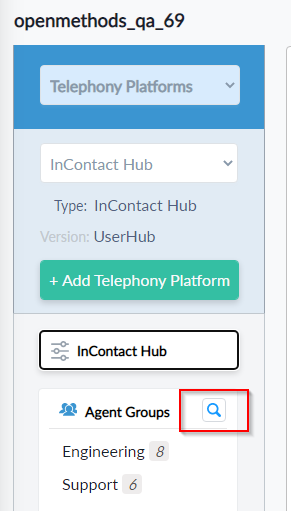
- Click the Advanced Search button as indicated in the first screenshot below.
- The search button is available in both Telephony Platform and CRM Instances.
- The results window will show all the agents added for the selected Telephony Platform including Agents under Agent Groups.
- By default the grid will show 25 items, we can change it to display up to 100. Click the page navigation button to navigate to other pages.
- We can filter agents by group name by selecting the group name from the Group drop-down control.
- Type a text in the text box to search. The search will be performed to find the matching string in the username or full name.
- Search is case-insensitive.
- If there are more than 1000+ records it will take a few seconds to get the search result. (This will be improved in future releases)
- Click the column name to sort the data by that column.
- The total number of agents and Total Search results are displayed at the bottom of the grid.
- Under the Actions column Edit and Delete buttons are available to edit or delete any single agent.
- Delete will ask for confirmation before deleting the user.
 |
 |
Delete Feature
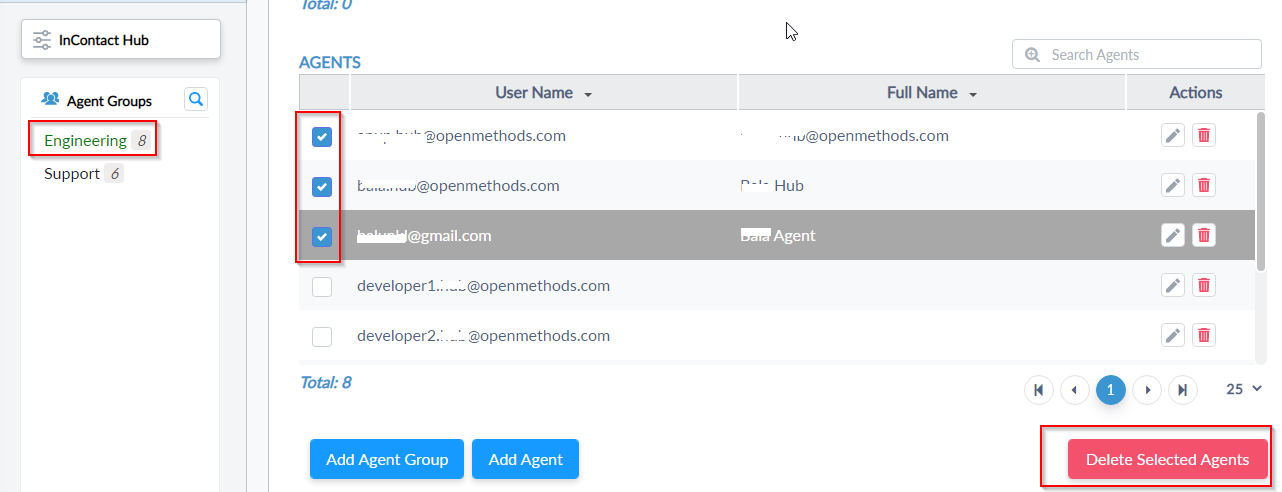
- The delete feature provides an option to delete a single item from the grid, select multiple items from the grid or delete all items listed in the grid.
- This feature is available in Telephone Platform Agents, Reason Codes, Logout Reasons, Interaction Dispositions, CallerIds, Quick Dials, and CRM Instance Users.
Delete a single CTI Agent
- An agent can be individually deleted by clicking the delete button located in the grid on each row.
- When you click the delete button, a confirmation window will be displayed. Click the Delete button.
Delete the selected agents
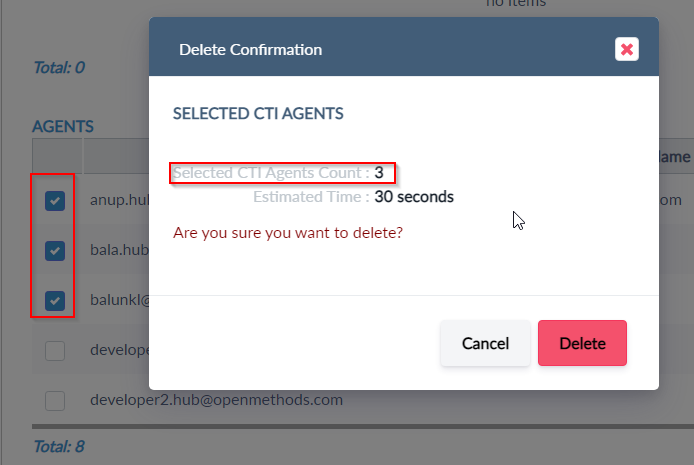
- Multiple agents can be deleted by selecting the check box in the agent's grid and clicking 'Delete Selected Agents'.
- The confirmation window will show the number of agents selected for deletion.
 |
 |
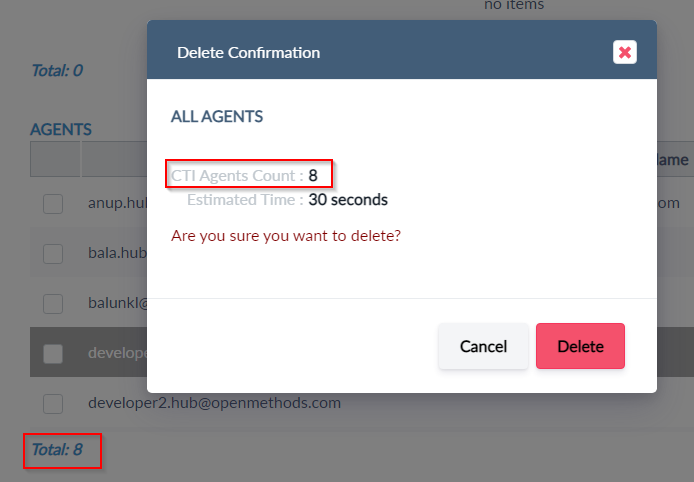
- All the agents listed in the grid can be deleted by clicking the 'Delete All Agents' button.
- When you click the "Delete All Agents" button, a confirmation window will be displayed. Click the Delete button.
- Then type the word DELETEALL text in the Confirm Name text box and click the Delete button again.
- Note:
- Pasting (Ctrl+V) the DELETEALL text will not be allowed to avoid accidental deletion.
- "DELETEALL" will delete the agents listed in the grid only.
- The confirmation window shows the total number of agents that will be deleted.
 |
 |
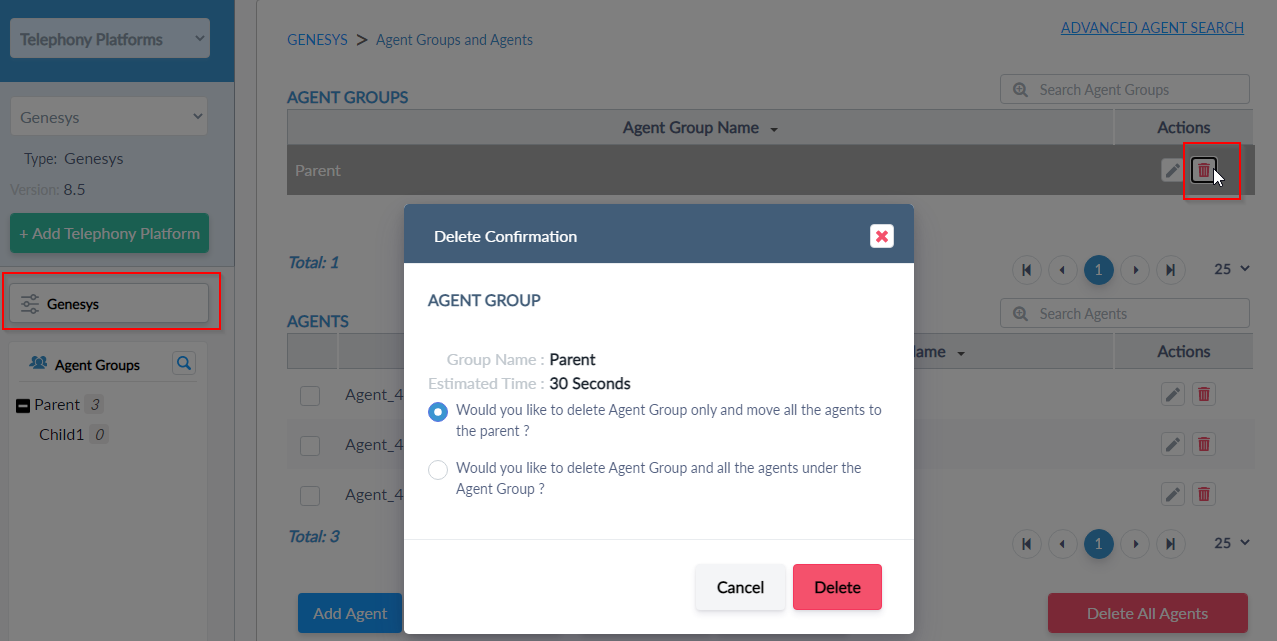
Delete an Agent Group
- When you click the Delete button, the "Delete Confirmation" window will be displayed with two options:
- Option 1: Would you like to delete Agent Group only and move all the agents to the parent?
- If we select this, the Agent group only will be deleted and all the agents under the agent group will be moved to the parent. The parent can not another agent group or Telephony Platform.
- Option 2: Would you like to delete Agent Group and all the agents under the Agent Group?
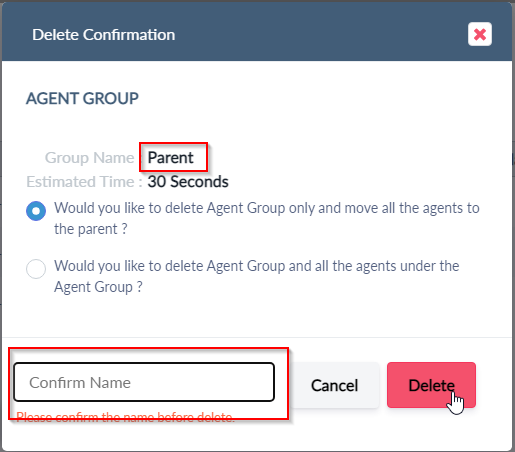
| Delete Confirmation | Second Confirmation for more security |
|---|---|
 |
 |
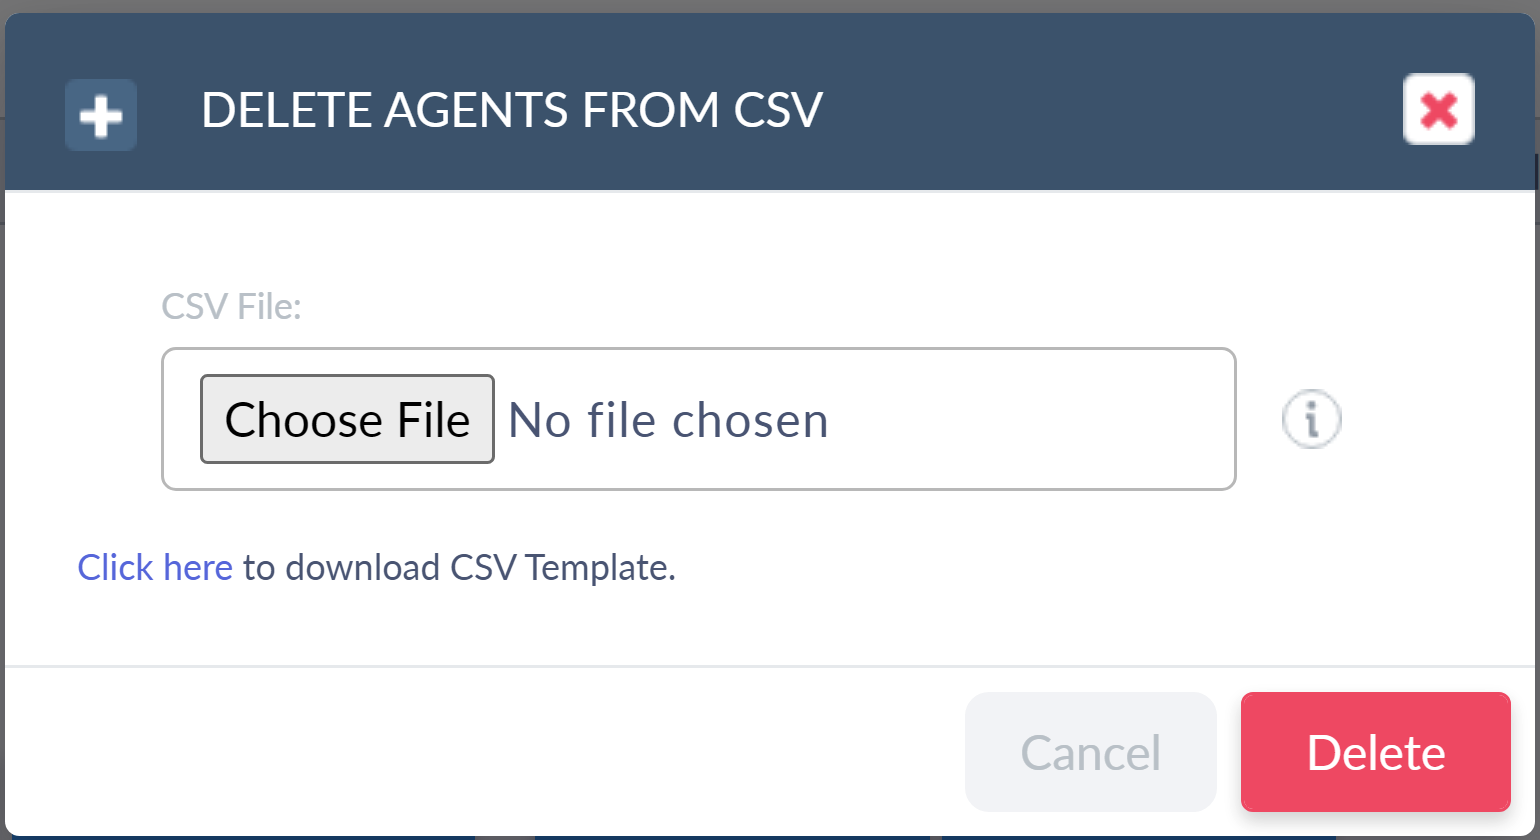
Bulk Delete CTI Agents
We have provided a bulk delete option to delete multiple agents from CSV files. add a Bulk Delete Agents button at the bottom of the Agents groups/Agents tab. this part will display if the Environment has at least one or more agent records.

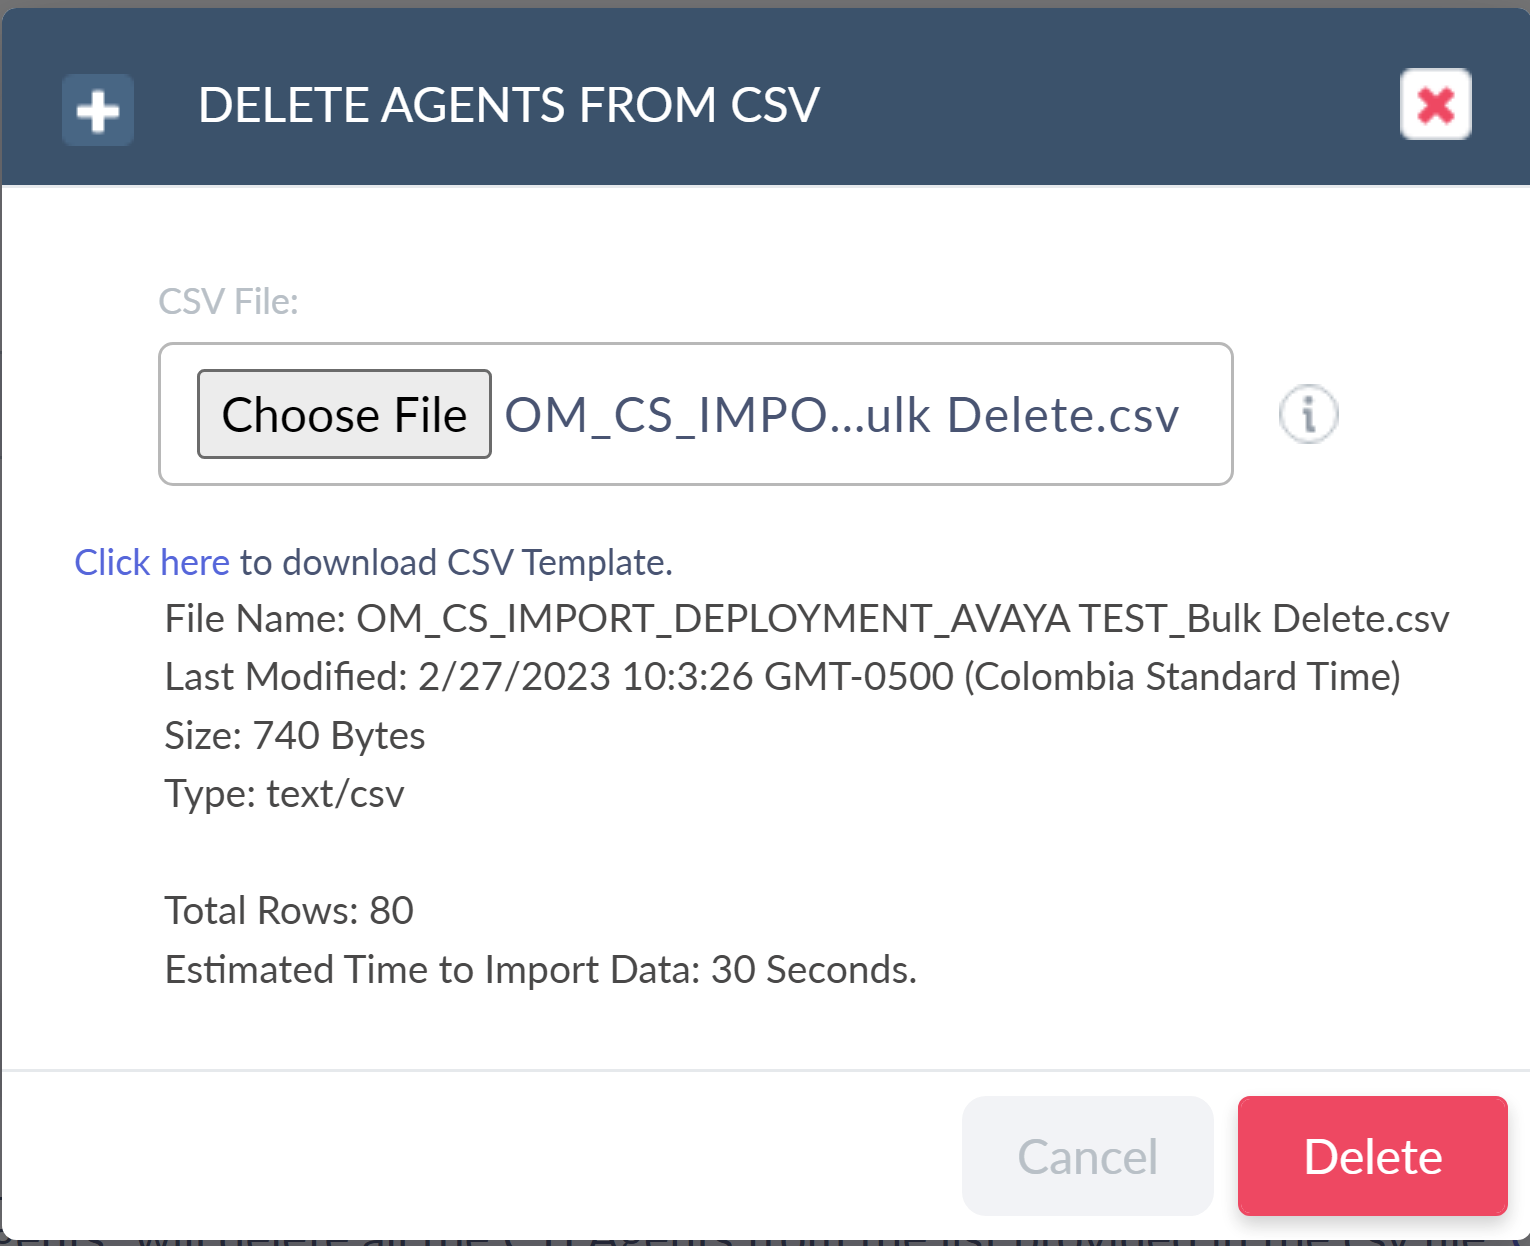
Once click on the "Bulk Delete Agents" button the below popup will open and we need to choose a CSV file with a list of agents that need to be deleted. you can download a template file from the "Click here" link.
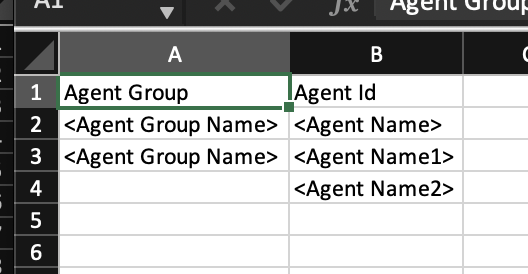
Find the CSV the format below [Add agents list whihc are want to delete]
Once selected the file it will populate the rows count.
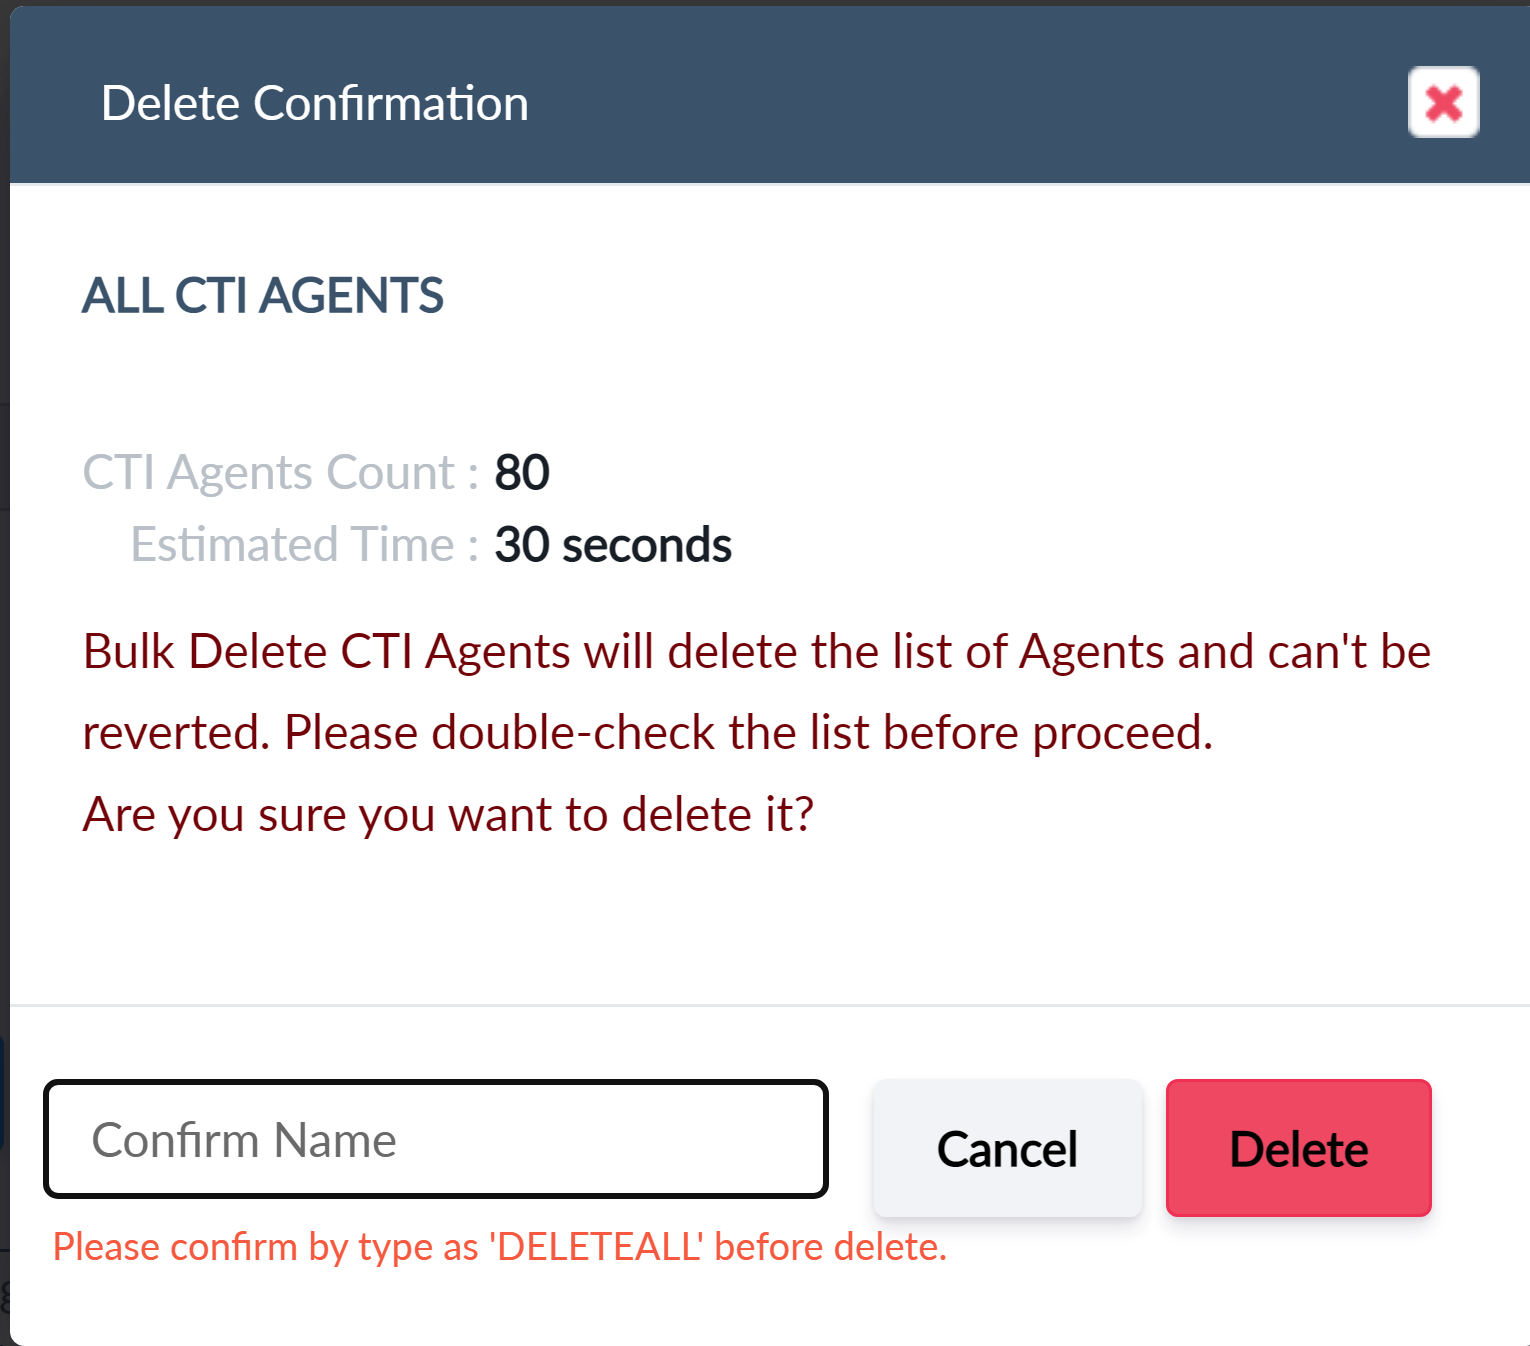
Confirmation popup

Additional confirmation popup please type as "DELETEALL" to confirm.
Once the bulk delete has been completed a popup will show the result at the top right corner.

CRM Users
Advanced Search
- Click the Advanced Search button as indicated in the first screenshot below.
- The search button is available in both Telephony Platform and CRM Instances.
- The results window will show all the users added for the selected CRM Instance including Users under Users Groups.
- By default the grid will show 25 items, we can change it to display up to 100. Click the page navigation button to navigate to other pages.
- We can filter users by group name by selecting the group name from the Group drop-down control.
- Type a text in the text box to search. The search will be performed to find the matching string in the username or full name.
- Search is case-insensitive.
- If there are more than 1000+ records it will take a few seconds to get the search result. (This will be improved in future releases)
- Click the column name to sort the data by that column.
- The total number of users and Total Search results are displayed at the bottom of the grid.
- Under the Actions column Edit and Delete buttons are available to edit or delete any single user.
- Delete will ask for confirmation before deleting the user.

Delete Feature
- The delete feature provides an option to delete a single item from the grid, select multiple items from the grid or delete all items listed in the grid.
- This feature is available in Telephone Platform Agents, Reason Codes, Logout Reasons, Interaction Dispositions, CallerIds, Quick Dials, and CRM Instance Users.
Delete a single CRM User
- A user can be individually deleted by clicking the delete button located in the grid on each row.
- When you click the delete button, a confirmation window will be displayed. Click the Delete button.
Delete the selected users
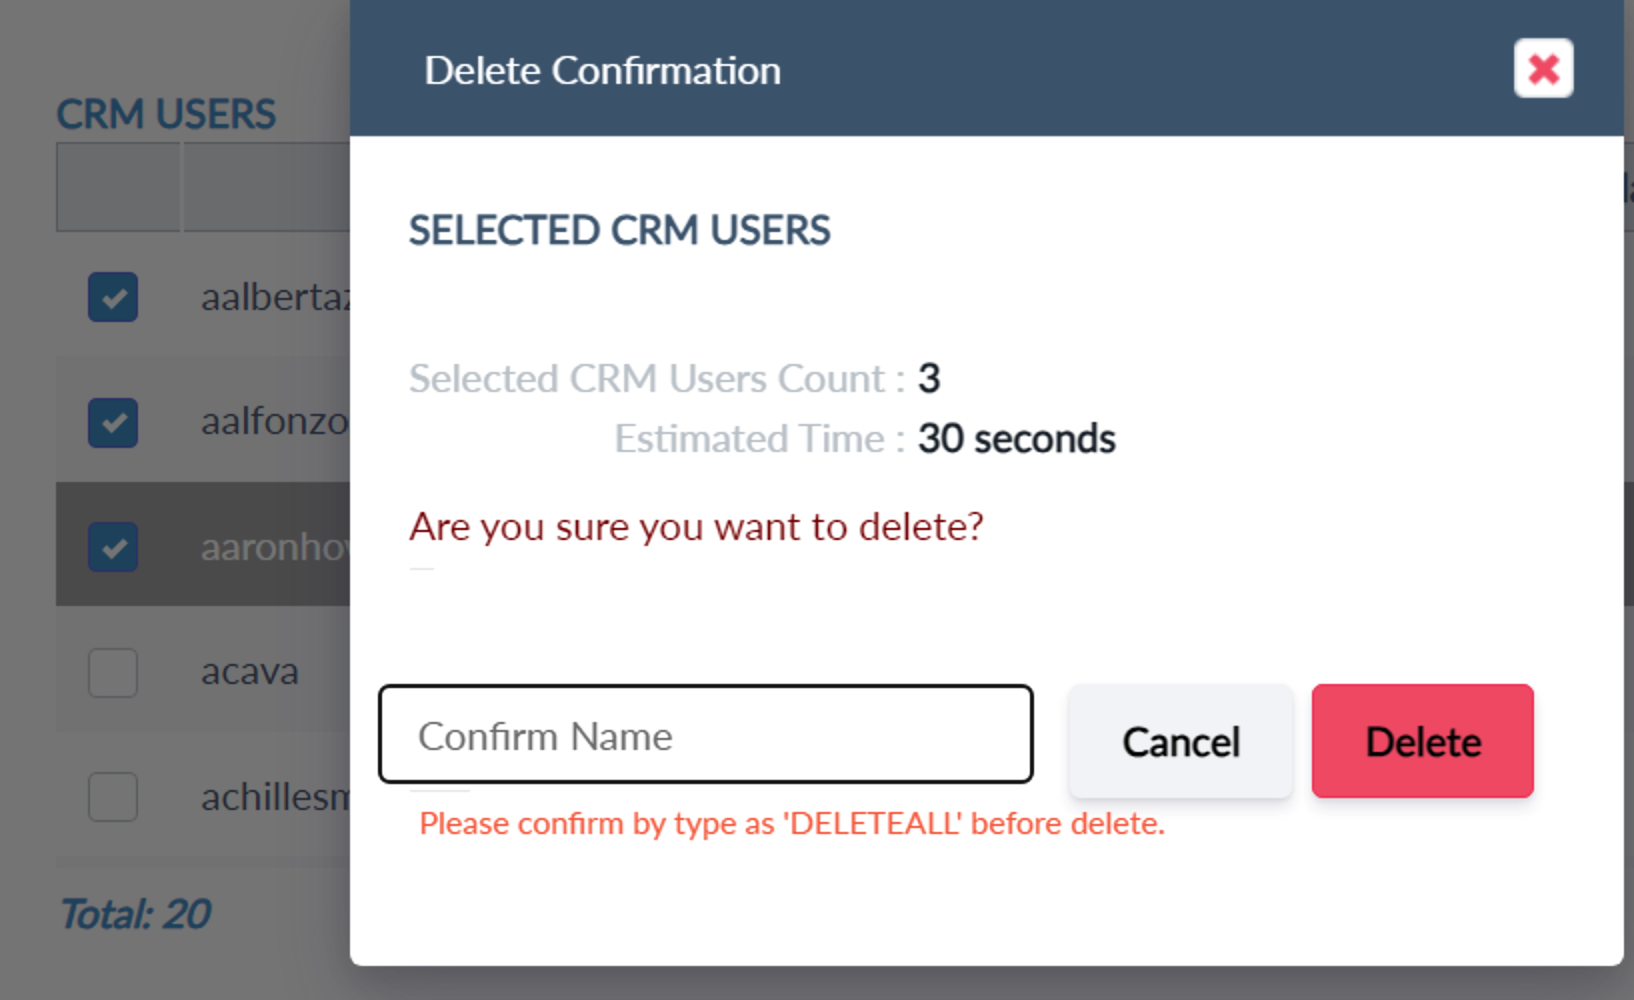
- Multiple users can be deleted by selecting the check box in the agent's grid and clicking 'Delete Selected Users'.
- The confirmation window will show the number of users selected for deletion.
 |
 |
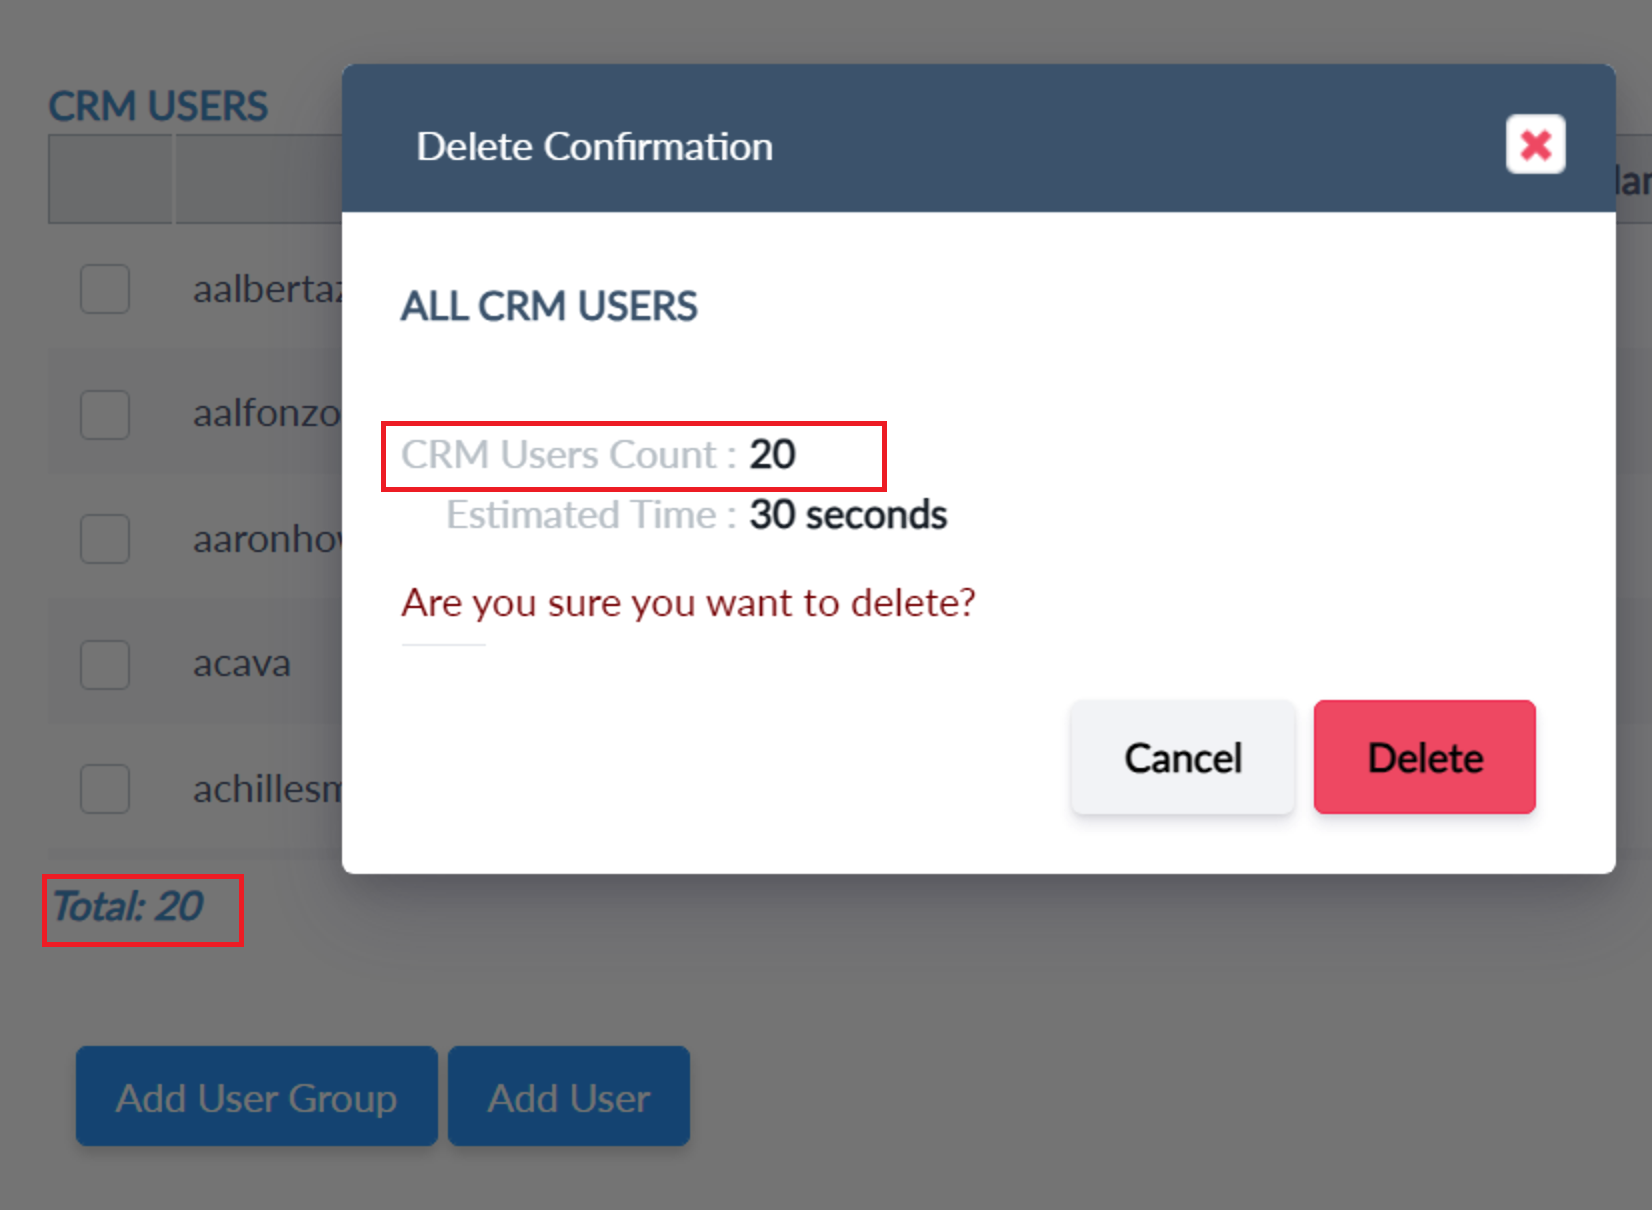
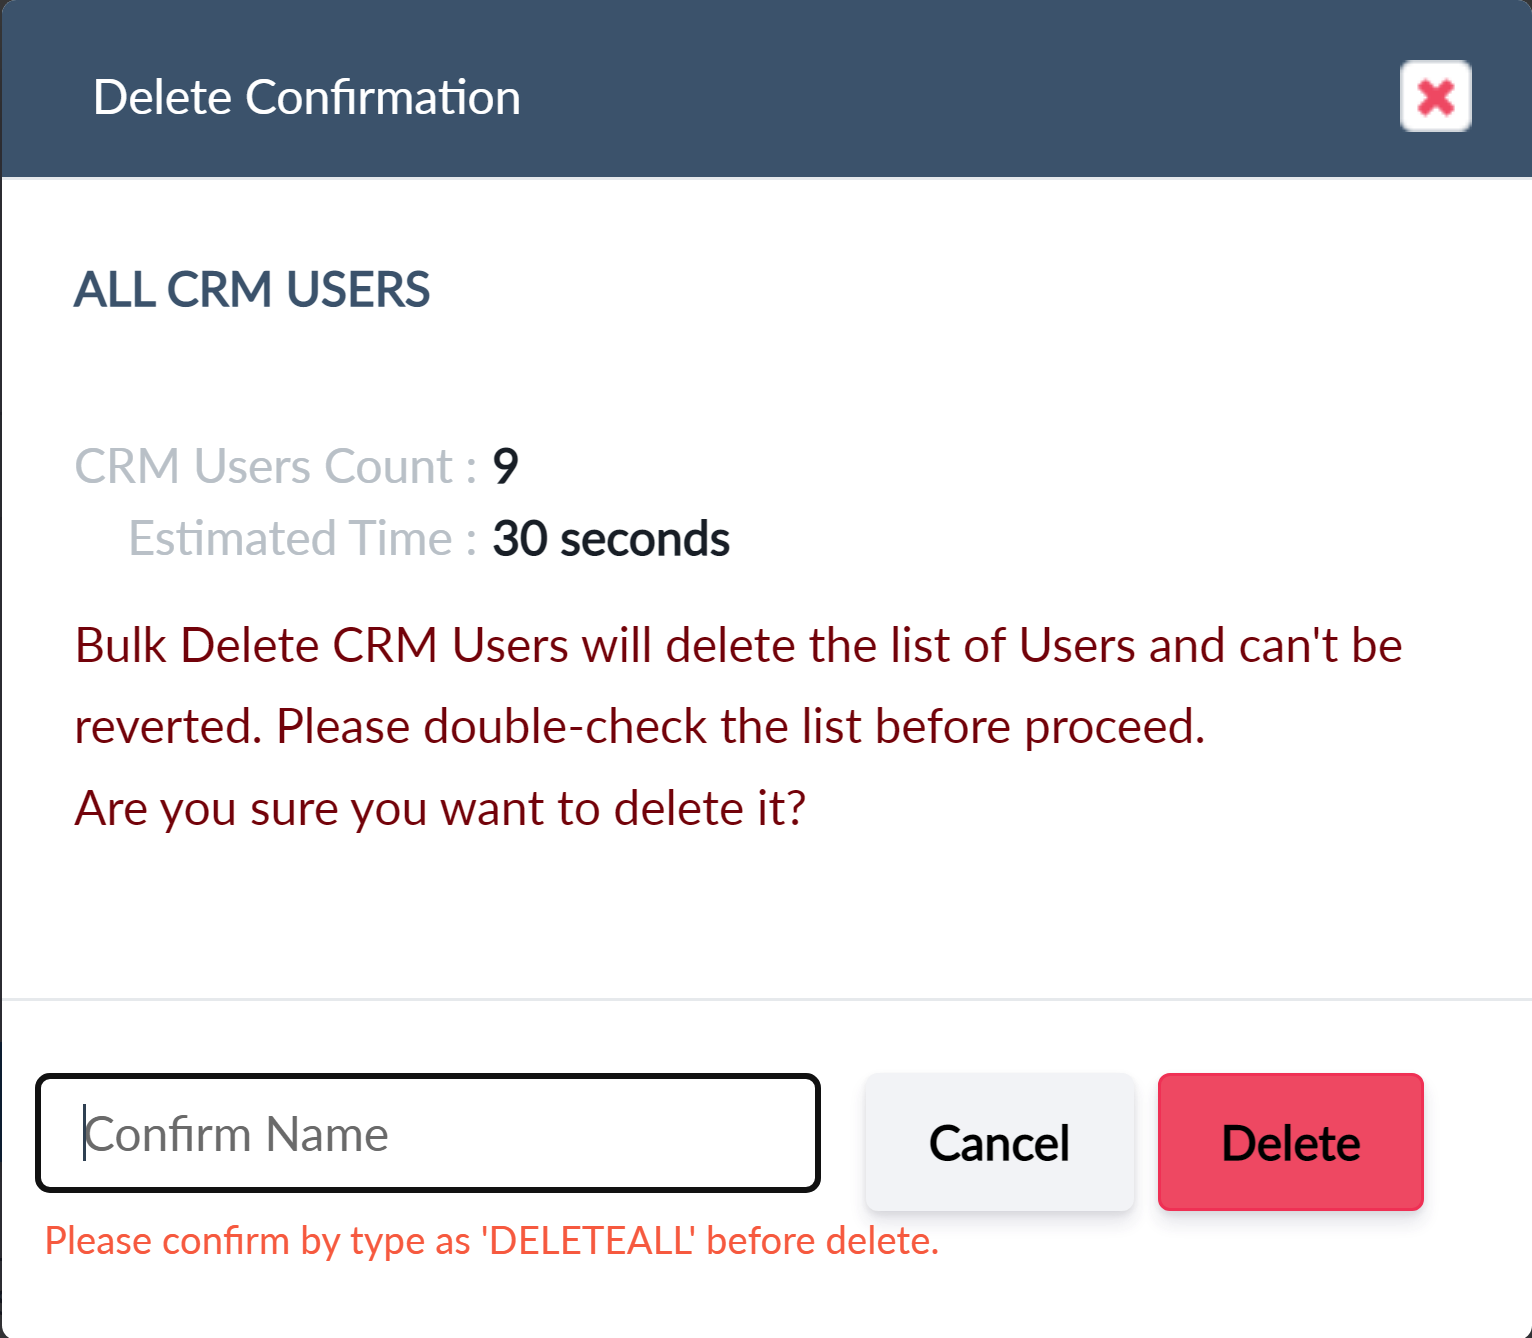
- All the users listed in the grid can be deleted by clicking the 'Delete All Agents' button.
- When you click the "Delete All Users" button, a confirmation window will be displayed. Click the Delete button.
- Then type the word DELETEALL text in the Confirm Name text box and click the Delete button again.
- Note:
- Pasting (Ctrl+V) the DELETEALL text will not be allowed to avoid accidental deletion.
- "DELETEALL" will delete the users listed in the grid only.
- The confirmation window shows the total number of users that will be deleted.
 |
 |
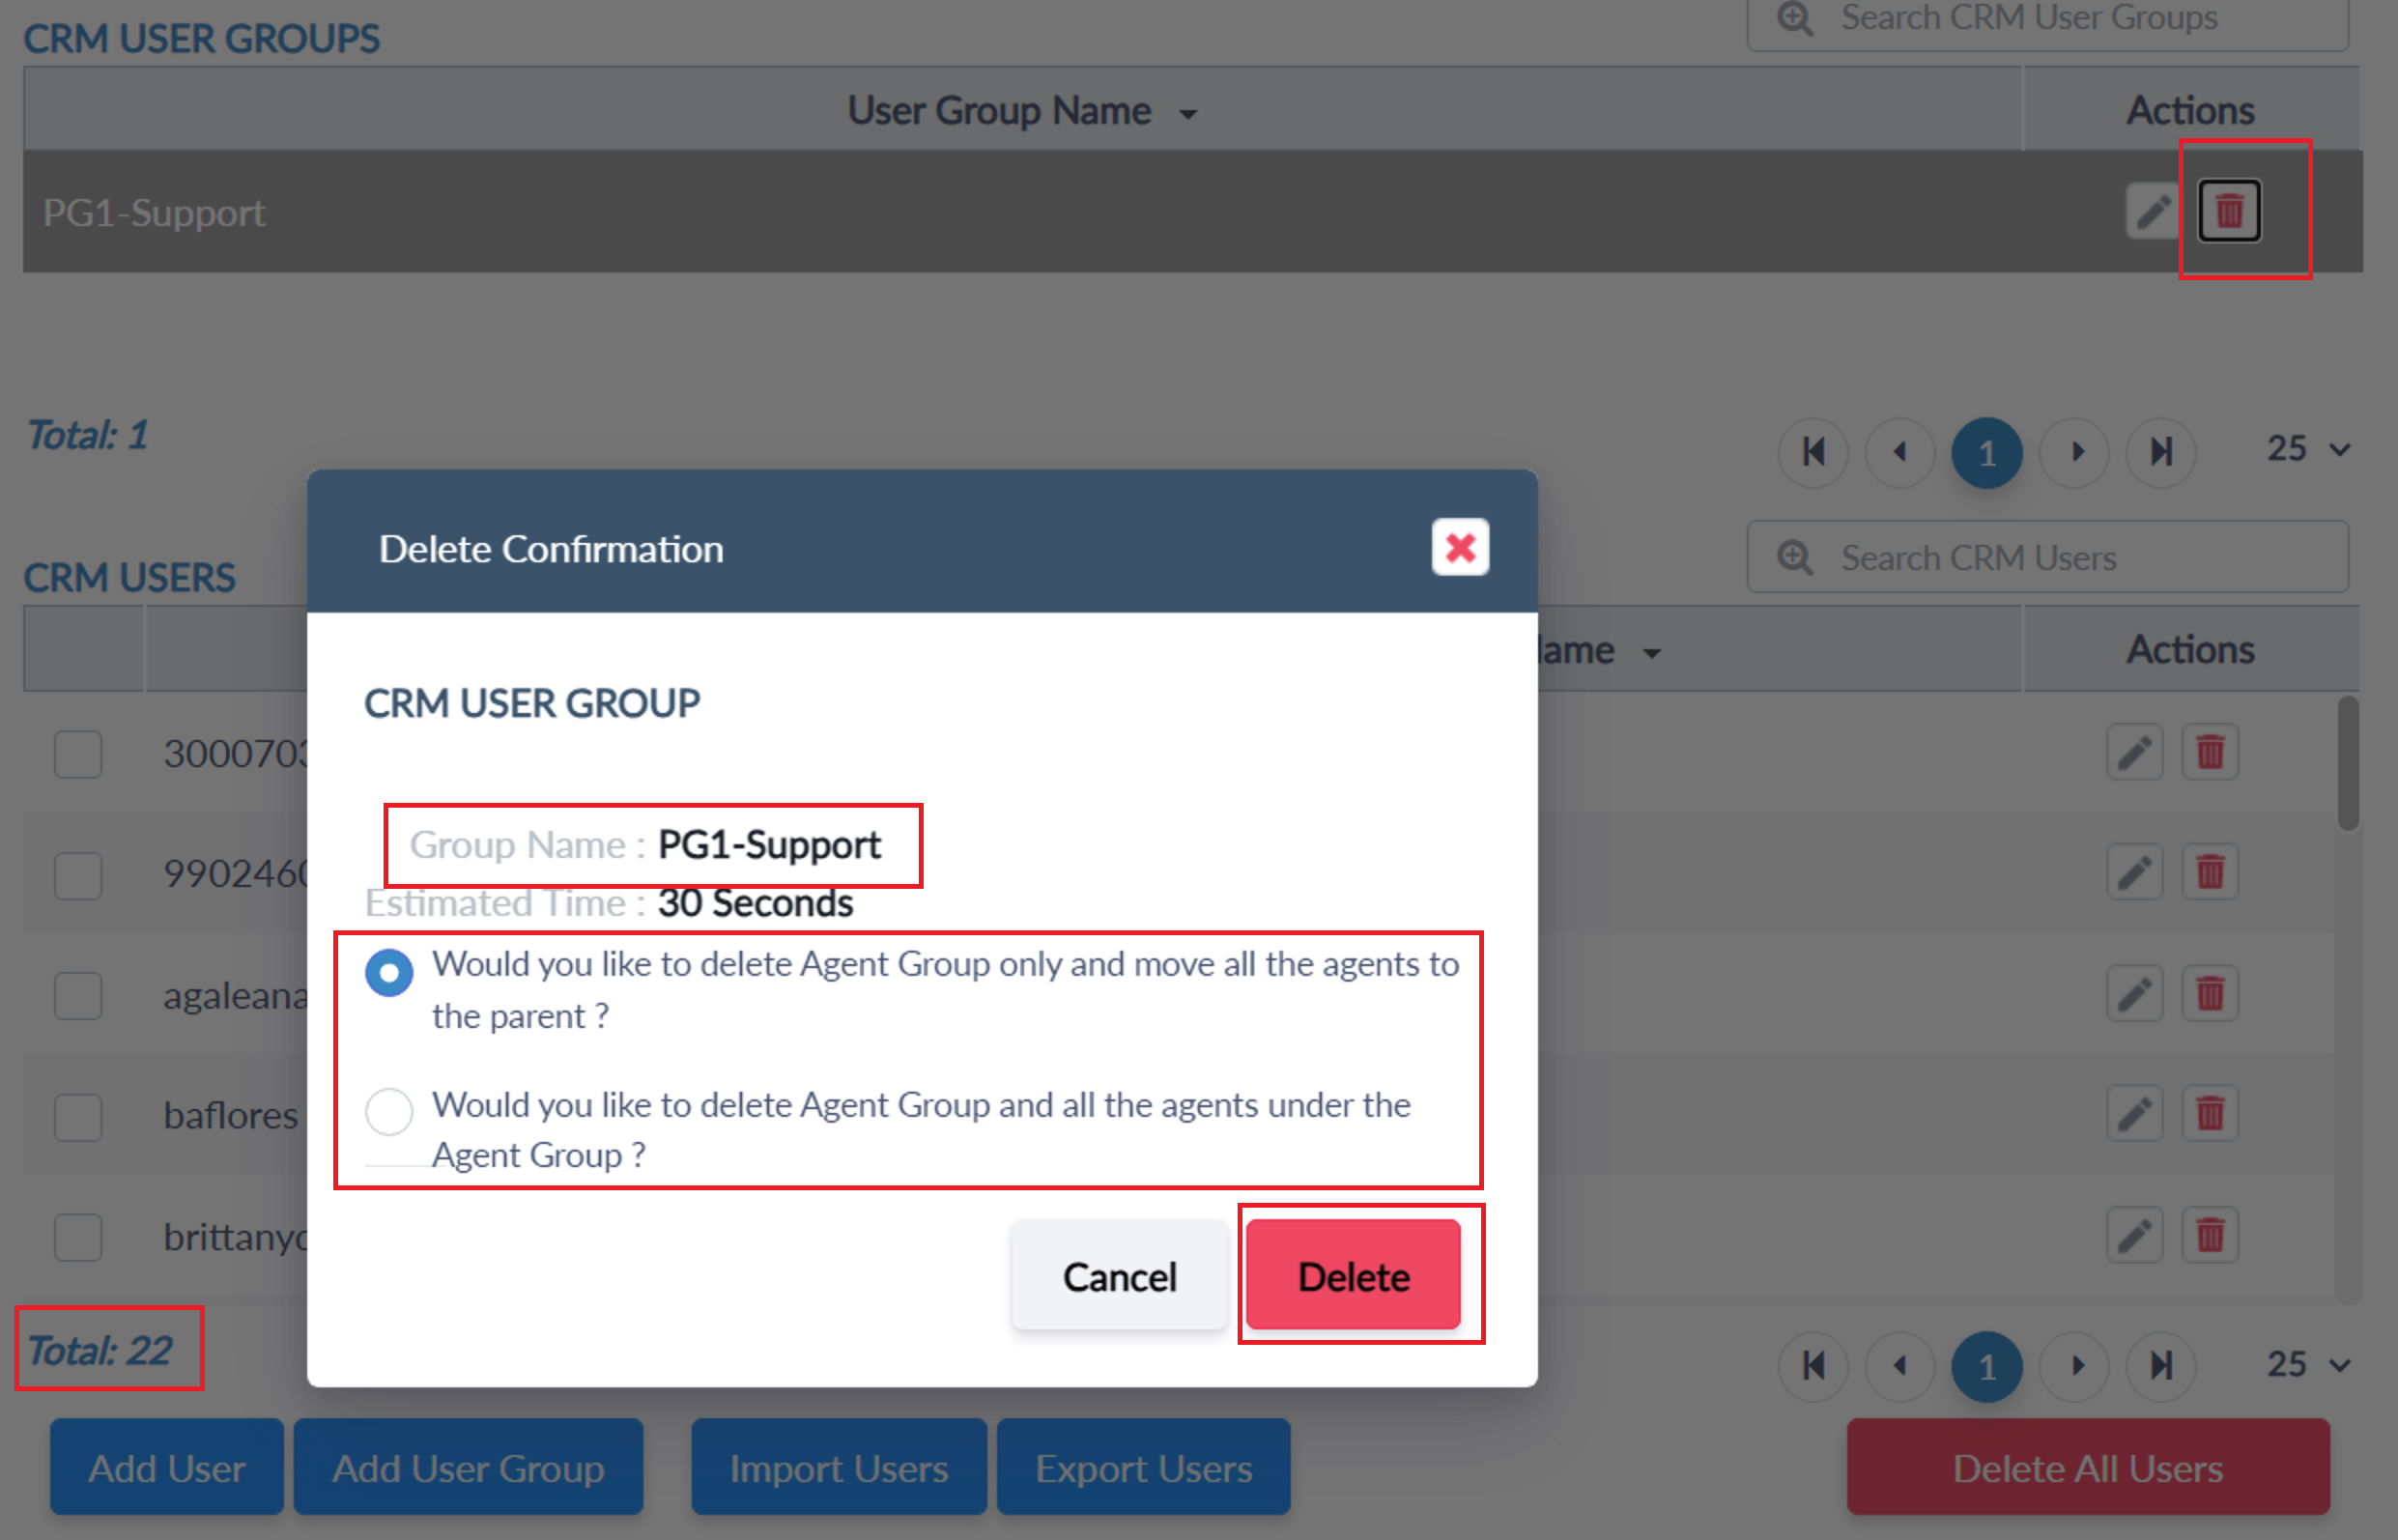
Delete a User Group
- When you click the Delete button, the "Delete Confirmation" window will be displayed with two options:
- Option 1: Would you like to delete the User Group only and move all the users to the parent?
- If we select this, the User group only will be deleted and all the users under the user group will be moved to the parent. If there is no parent user group then it will move to CRM Instance.
- Option 2: Would you like to delete the User Group and all the Users under the User Group?
| Delete Confirmation | Second Confirmation for more security |
|---|---|
 |
 |
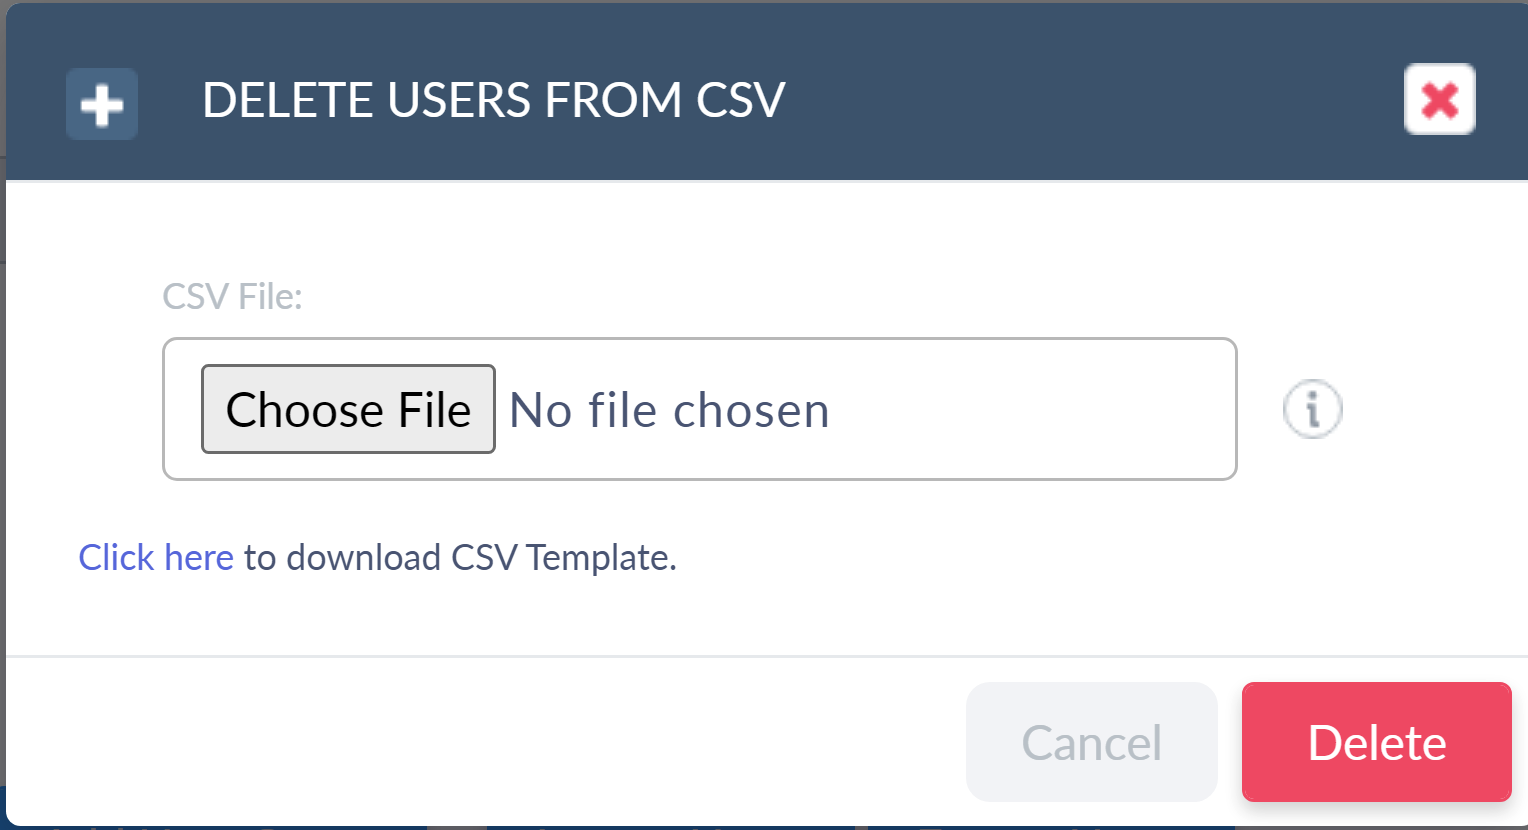
Bulk Delete CRM Users
We have provided a bulk delete option to delete multiple users from CSV files. add a Bulk Delete Users button at the bottom of the CRM Users groups/Users tab. this part will display if the CRM Instance has at least one or more users.

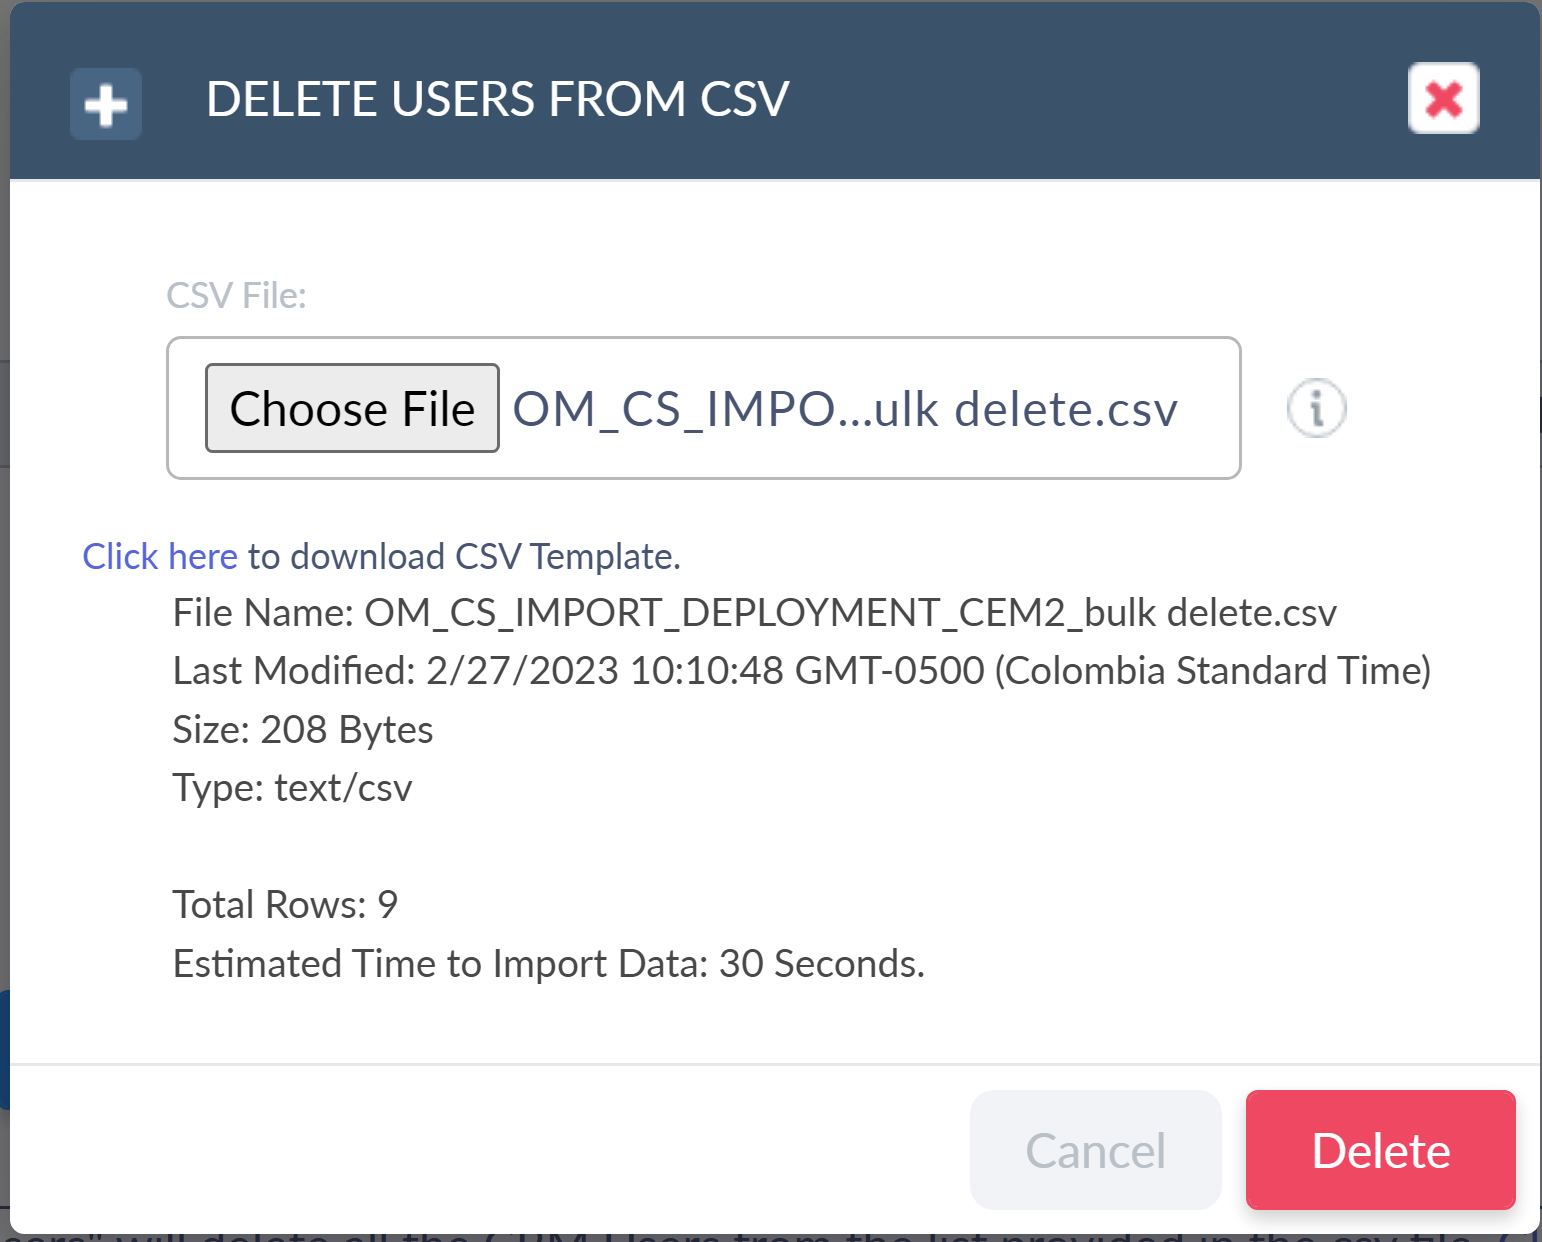
Once click on the "Bulk Delete Users" button the below popup will open and we need to choose a CSV file with a list of Users that need to be deleted. you can download a template file from the "Click here" link.
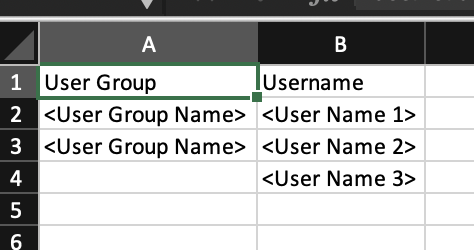
Find the CSV in the format below [Add agents list which are want to delete]
Once selected the file will populate the rows count.
Confirmation popup

Additional confirmation popup please type "DELETEALL" to confirm.
Once the bulk delete has been completed a popup will show the result at the top right corner.