Overview
The 'Get Data' Activity allows you to get the data from the selected entity. You can add multiple filters to filter the data. It has three child buttons 'SINGLE MATCH', 'MULTI MATCH' and 'NO MATCH'. You can execute different activities on these buttons.
After opening the 'Get Data' activity, you will see the configuration panel as shown below.
Default Configuration Parameters:
- Enter Entity: Entity name to fetch the data.
- Enter Property: Selected entity property name.
- Enter value: Property value to be fetched.
- Comparison: Condition to fetch the data.
- Save Result In: All of the data fetched will be stored in this.
Filters: allows you to add multiple filters while getting the data from the selected entity.
How it works:
A Simple Example to configure the 'Get Data' activity in PopFlow Studio.
- Select the 'Get data' activity from 'Activity Sidebar'.
- Click on 'get data' activity to open and configure the 'Get data' activity.
- Click on the 'Enter Entity' field to enter the 'Entity' name.
In this example, we are trying to get the contact information by using the 'phone number' or 'first name' of the caller.
- Select the 'Contacts' entity from the list.
- Fetch Details: select the checkbox to get all the data from the selected Entity.
- Filters: In the filter section, click on the 'Enter property' field. It will show the property list of the selected entity as shown below.
- In the 'Enter Value' field, enter the appropriate value to perform the filtering on the selected 'Entity'. You can add multiple filters in the 'Get Data' activity by clicking on the filters button.
- Select the comparison type from the comparison list as shown below:
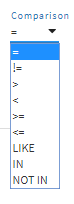
You can select any one comparison in a filter.
- Once the configuration of 'Get Data' activity is completed, the changes will be displayed as shown below.
You can use the variable name or enter the value directly into the 'Enter Value' fields.
- After filling the values in the given fields, you can close and save the activity by clicking outside of the activity panel.
You will notice three child buttons under the 'Get data' Activity.
- SINGLE MATCH: if the 'Get Data' activity has only one value, this button activity will execute.
- MULTIPLE MATCH: If the 'Get Data' activity has multiple values, this button activity will execute.
- NO MATCH: If no result, this button will execute.
You can open any activity on these buttons and use the result of the 'Get Data' activity to execute the activity.
Examples: on 'Single Match' you can open the workspace of the customer, on 'Multiple Match' you can do the 'Pop Search & Select' and on 'No Match' you can create a contact.
Below is an example to add an activity and use the result of 'Get data' activity.