Preface
Welcome to OpenMethods Harmony BUI User Guide for Genesys PureConnect (CIC) Telephony Platform. This document provides an overview of all functionality available in the Media Bar which is embedded into the Oracle Service Cloud and its usage.
Features
- Setting Agent States
- Quick Dial
- Country Codes
- Outbound Dial w/rules
- Send DTMF signal
- Consult Conference
- Consult Alternate
- Consult Transfer
Intended Audience
This document is primarily intended for contact-center supervisors, trainers, administrators and agents.
Harmony BUI Media Bar
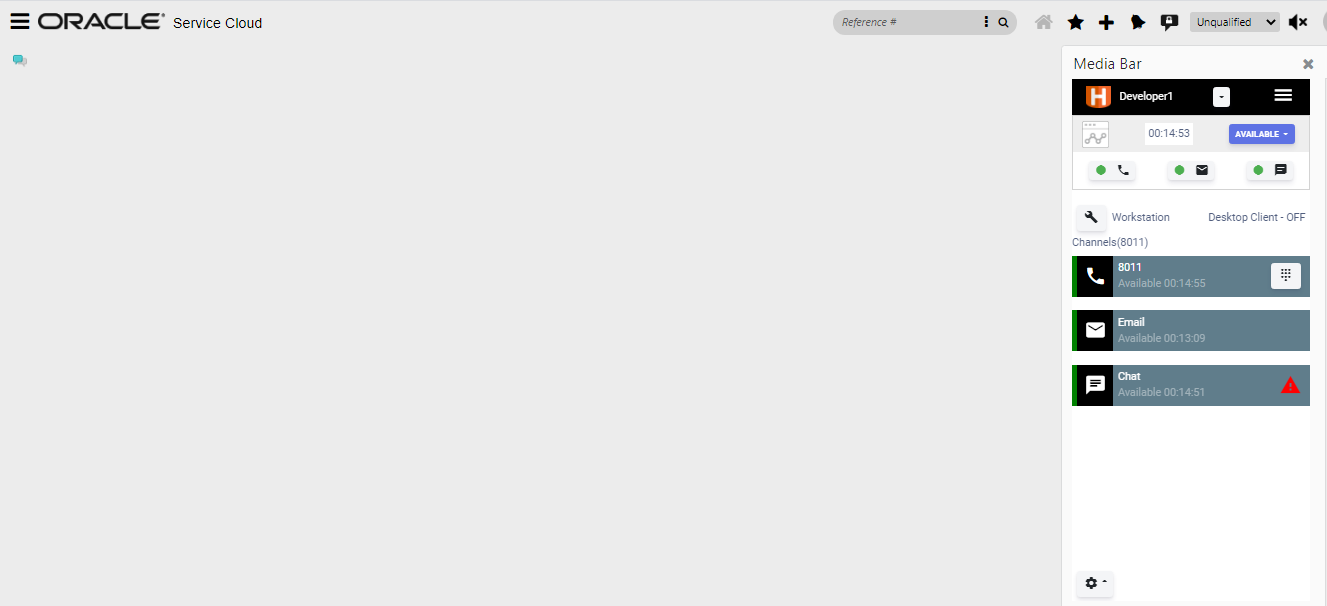
This guide is oriented around the Harmony Media Bar which is shown on the right-hand side of the Oracle Service Cloud Agent BUI:
Agent Session Management
This section explains the usage of Harmony Media Bar login to create an agent session with the PureConnect server and logout from the current session.
Login
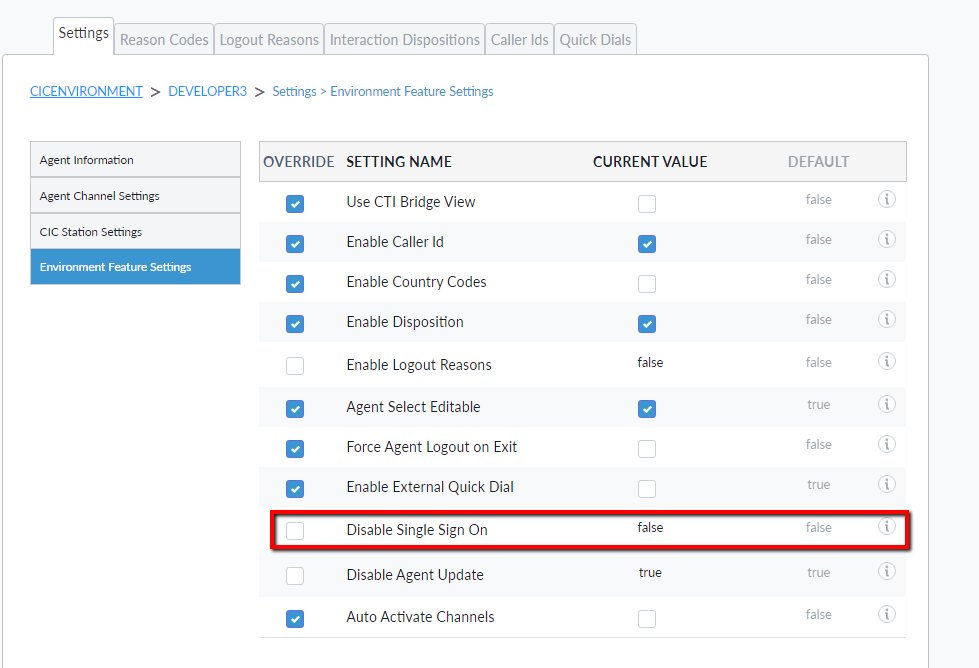
When the agent logging into Oracle Service Cloud, Agent will automatically be logged into the Harmony Media Bar, if ‘Disable Single Sign-On’ is not enabled, with the credentials and Workstation added in the Configuration Server.
 |
 |
Agent Info update
 |
|
Agent info disable
|
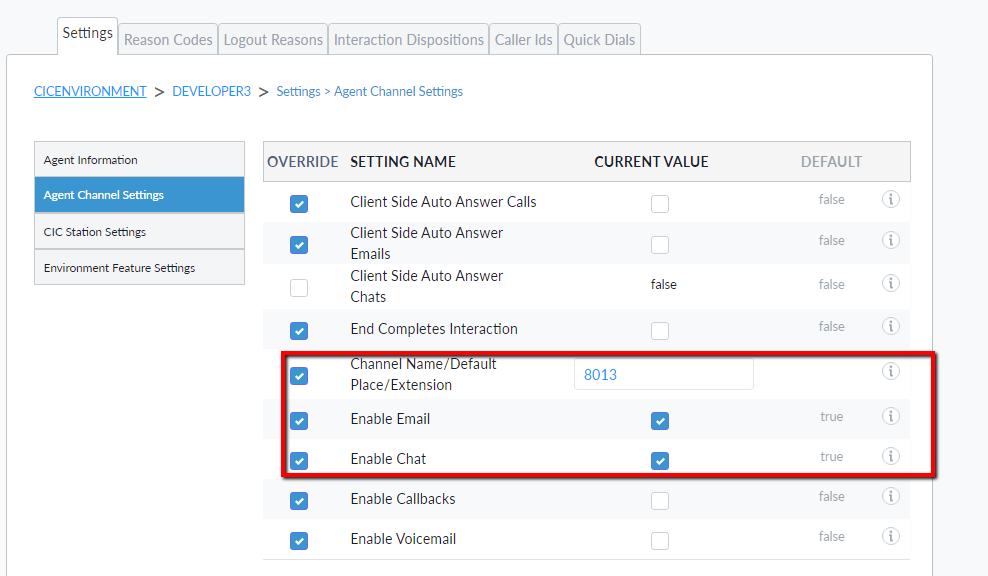
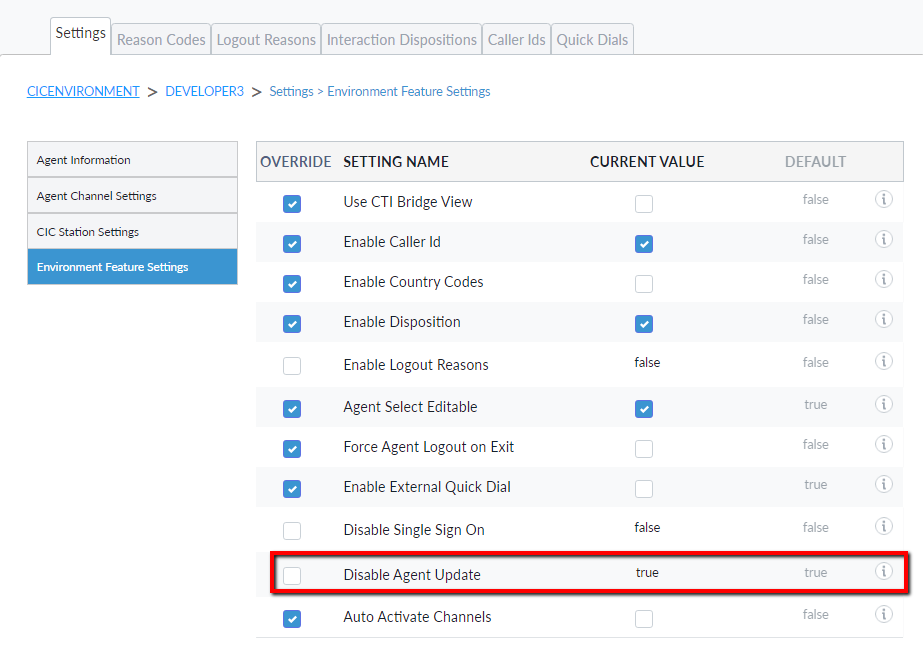
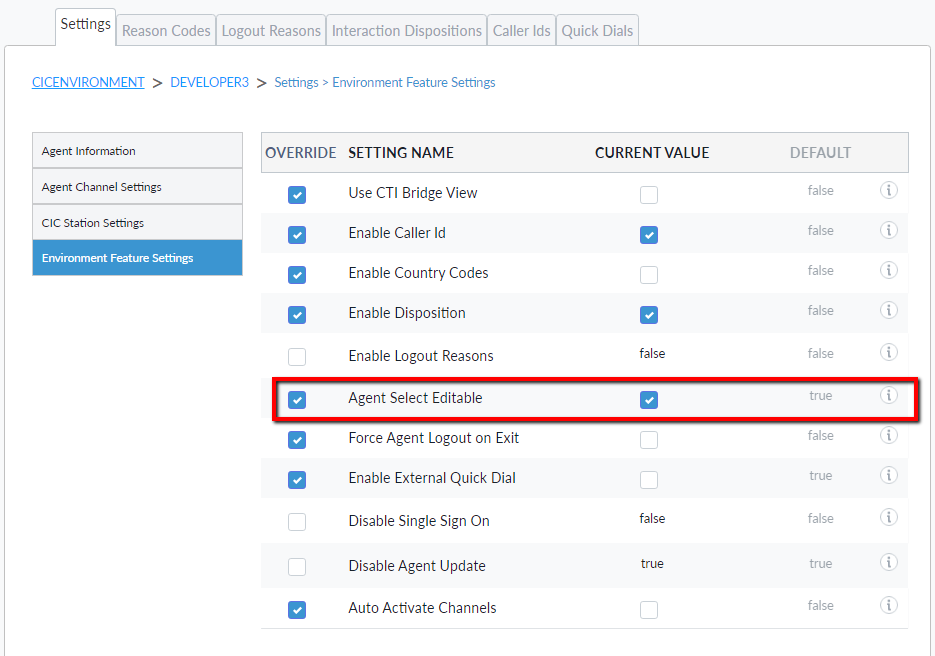
By default, the agent will be able to edit the agent information while login. ‘Agent Select Editable’ is disabled on the Config Server. By default, it’s true/checked. If the agent does not want to update the agent information while login in, the administrator can enable and uncheck the value. |
 |
Logout
 |
|
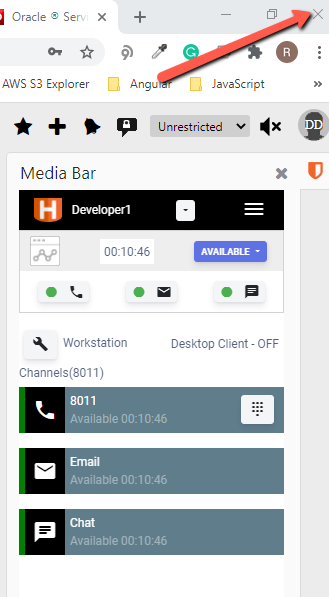
Exiting Oracle Service Cloud
|
* It is recommended to logout Harmony Media Bar first then exit Oracle Service Cloud. |
 |
Harmony Media Bar Overview
After successful login, agent session will be created with the PureConnect Server, and Harmony Media Bar’s main page will be displayed. The main page in the Harmony Media Bar contains 3 sections as Header, Channels, and Interactions.
Header
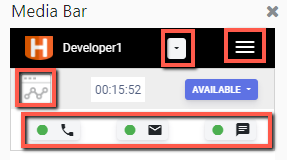 |
This section contains Harmony logo, Logout button, Agent status indicator, Agent Name, Agent Session timer, Agent status drop-down box, Workstation, Agent Interaction Desktop Client status and Workgroups (this can be used for workgroup activation and deactivation). |
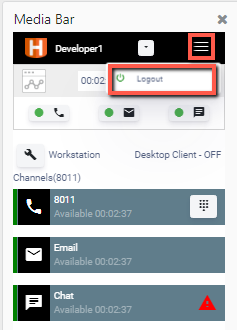
Logout
Used to logout from the current agent session.
Agent Status Indicator
It shows the current agent status for specific channels (telephony, chat, email) and we have a button to hide and show the specific channel. Green color circle with channel icon shows the agent is available for that channel. If the agent status is unavailable it will show in red color. If the agent is handling interaction it will show red color with number of interactions.
Agent session timer
This timer shows how long agent has been logged in.
Agent Status
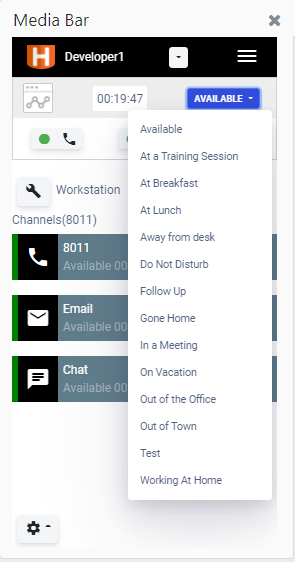 |
This control is a drop-down box, which contains the list of Agent Statuses which are configured in the PureConnect Server will be shown into the Agent status drop-down, by using this, Agent can change his status to Available, Wrap-up (ACW – After Call Work), break, lunch, etc. Agent statuses are directly pulled from PureConnect server during Harmony WebBUI Media Bar login. |
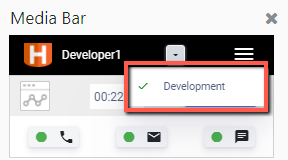
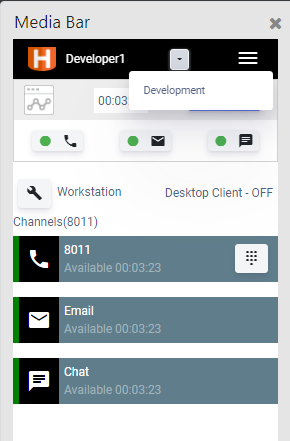
Workgroup activation/deactivation
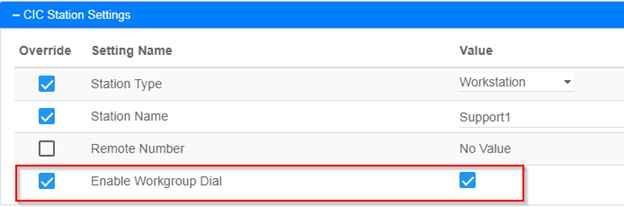
Agent can activate/deactivate the workgroup with check/uncheck the checkbox. The workgroup list will show a list with checkboxes. The checked list will be shown into the ‘Dial on behalf of workgroup’ dropdown in the Dial Pad window. This can be used while dialing the outbound call.
 |
 |
No workgroup assigned
 |
|
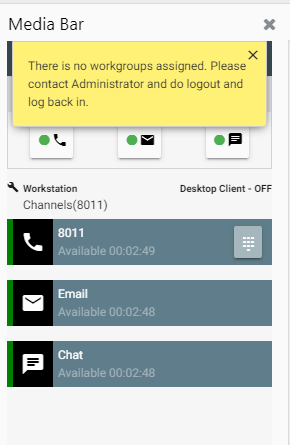
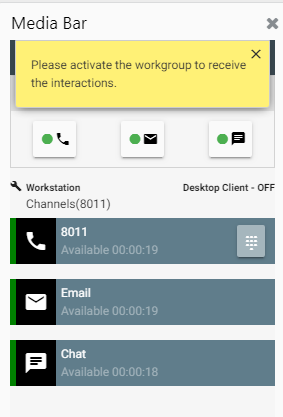
No active workgroup
|
When agent has no active workgroup then he will not receive any interaction until he activates the workgroup. The warning message will be shown to the agent when no active workgroups found. |
 |
Agent Workstation
 |
|
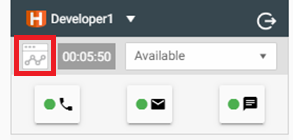
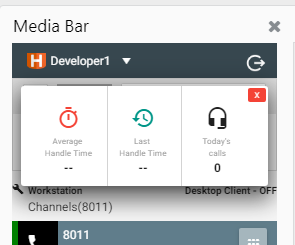
Agent Call Summary
| Display the Agent call details. |
|
Desktop Client
Display the status of the Interaction Desktop client. If the agent logged into the Interaction Desktop Client. It will show Desktop Client– ON.
Channels
This section contains channels the agent is skilled to handle. Each channel contains Channel state indicator, Channel icon, Agent Extension, Channel state, Channel State duration timer and Dialer button. Depends on the Agent Status these items will be changed.
The channel can be in 4 states such as Active Available, Active Unavailable, Handling Interaction and Wrap-up.
Channel State duration time - which shows how long the channel state is in the current state.
Channel Active and Agent Status Unavailable
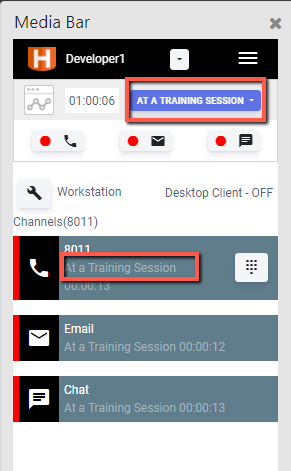 |
After login, Channels will be loaded for the skills agent is configured for. For example, if the agent is skilled to handle voice only then Voice channel only will be loaded. After login, the agent status will be shown as Unavailable or Agent status set in the previous session.
|
Channel Active and Agent Status Available
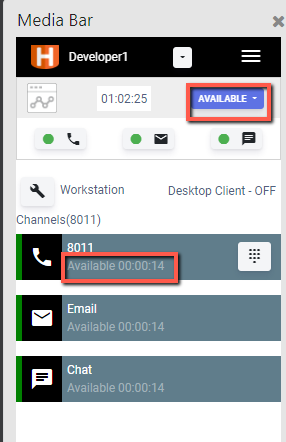 |
After agent changes his status to available by using the drop-down box located in the header section. The Channel State Indicator will be in green color and Available text will be displayed. |
Channel Active and Agent Handling Interaction
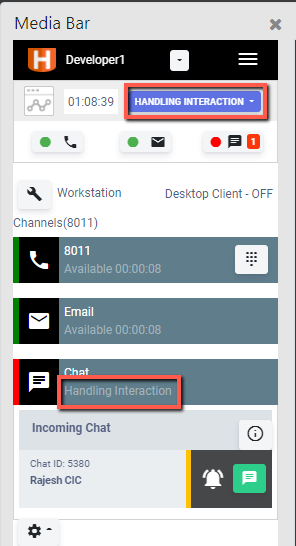 |
If the channel active and agent status is available, and a new interaction comes in, the Channel State indicator will be changed to red color with cross lines and State text will be ‘Handling Interaction’. |
Channel Active and Agent status is in Wrap-up
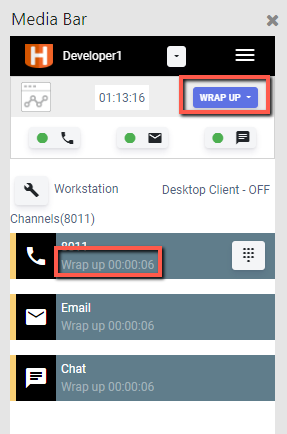 |
Agent Requested Wrap-up (ACW - After Call Work) Auto Wrap-up If the auto wrap-up is enabled in the PureConnect server configuration, after the end of the phone call, agent status will be automatically changed to Wrap-up. It will stay in wrap-up mode until the end of the pre-defined wrap-up time set in the server configuration. |
Agent Chat session
After login, the Harmony Media Bar Channel will automatically go to the Active state, depending on agent status with the Oracle Chat Server.
Agent chat status is Unqualified
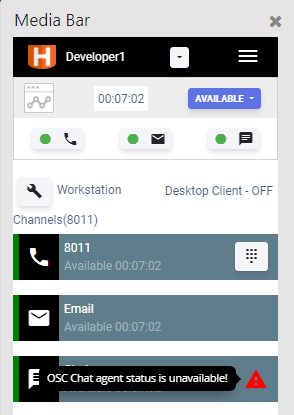 |
If agent chat status is Unqualified in OSC we are showing an error when the agent hover on that Triangle. |
Agent chat logout from OSvC chat widget.
|
If OSvC status is “Logged Out” then we must click on
|
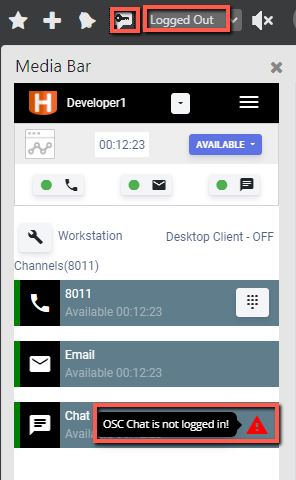 |
 to login again.
Chat session connected, and Agent is available
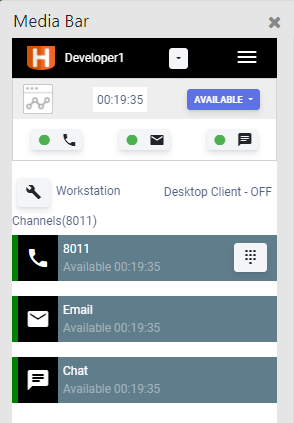 |
Interactions |
Interactions
There are two types of voice interactions such as Inbound Call and Outbound Call.
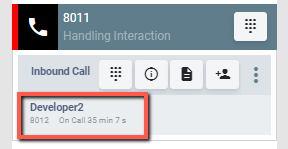
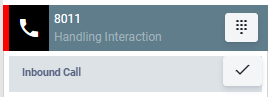
Inbound Call Interaction
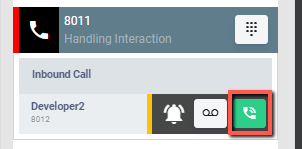 |
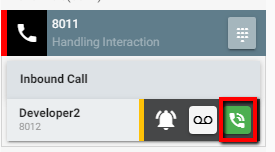
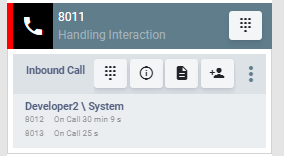
If the agent is handling an inbound call, the panel header will display the Inbound phone icon and Inbound Call text as shown below: |
Outbound call Interaction
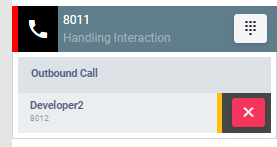 |
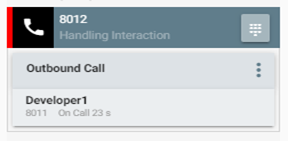
If the agent is handling an outbound call, the panel header will display the Outbound phone icon and Outbound Call text as shown below: |
Voice Interaction Controls
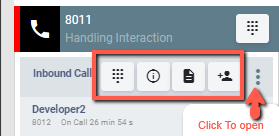 |
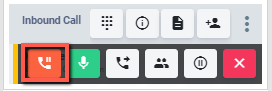
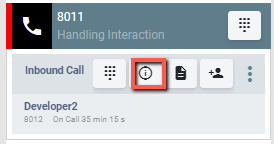
On the Interaction panel, the top right side contains Interaction level action controls as indicated in the below image. After answering call:  This button is used to send DTMF. This button is used to send DTMF.
|
 This button is used to make Consult Call.
 This button is used to view the data attached to the call.
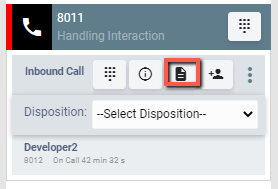
 This button is used to send disposition.
Conversation Controls
 |
The section marked in the below images indicates the Conversation section of the call. The interaction panel will look as below when a new call comes in and before the agent picks up the call. |
 |
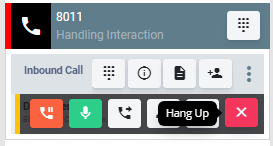
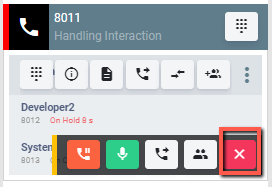
After answering the call: 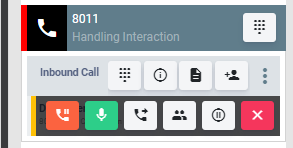
|
|
8011 This number indicates the caller Id. If the phone call is an internal call then it will show the other party’s extension or for an external, it will show the calling party’s caller Id (ANI – Automatic Number Identification). If the calling party’s name is available, it will be displayed above the caller Id.
| |
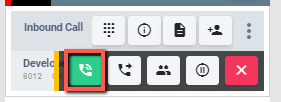
 Click this button to pick up the call.
 This button is used to hold the call.
 This button is used to disconnect the call.
 This button is used to make Blind Transfer.
 This button Is used to make Blind Conference.
Incoming Email Interaction
Before Accepting Email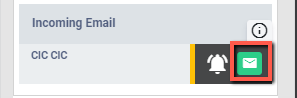
|
If the agent is handling an incoming email, the panel header will display the E-Mail icon and Incoming Email. |
|
After accepting the email: 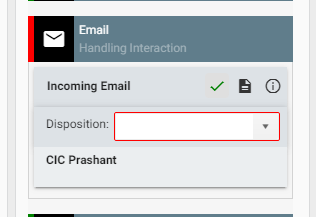
|
|
 This button is used to Accept email.
 This button is used to complete the email interaction.
 Click this button to open the Disposition drop-down box and a disposition to submit.
 Click this button to view the data attached to the Interaction.
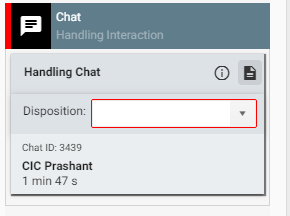
Chat Interaction
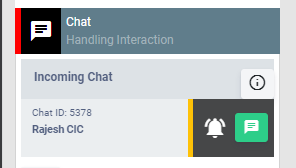
| If the agent is handling an incoming chat, the panel header will display the Chat icon and Incoming Chat text as shown below: Before Accepting the Chat: |
 |
|
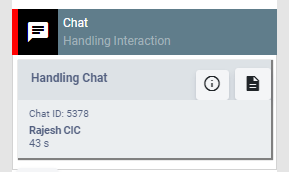
After accepting the Chat: |
 |
Voice Interactions
When Agent Status is Available, the agent is ready to take a phone call. if there is any customer call in the Queue-it will be routed to the agent. The following section explains the features to handle an interaction.
Pick up the call
 |
|
Auto Answer
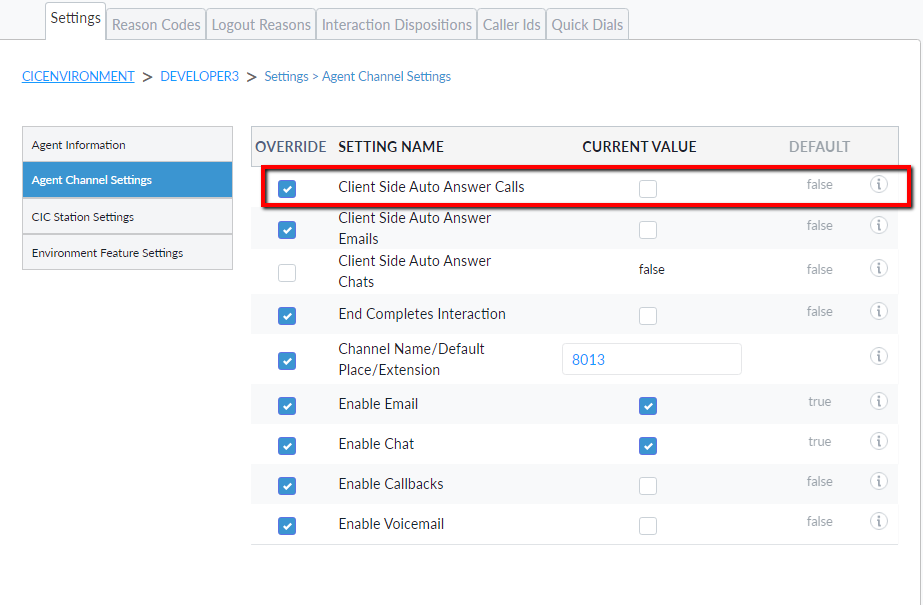
The call can be set to auto answered without the agent clicking the Answer button. Auto Answer can be enabled in 2 places:
• PureConnect server configuration
• “Client-side Auto-Answer Calls” under “CIC Environment-> Agent Channel Settings” in the Configuration Server.
Transfer to Voice Mail
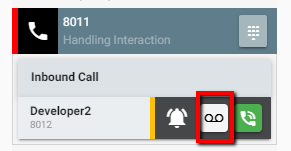 |
When the new voice call comes in, the agent can transfer the call to his voice mailbox, configured with Agent’s Extension in the PureConnect server, by clicking the Transfer to Voice Mail button. Customers can leave a voice message. |
Hold the call
 |
While talking with calling party, the agent can put the call on hold by clicking the Hold button as indicated in the image. The calling party will be on hold and hearing hold music. |
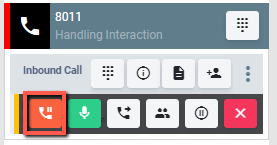
Retrieve the call
 |
When the call is on Hold, by clicking the Retrieve button the call will be retrieved. |
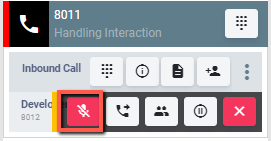
Mute the call
 |
Agent can mute the call by clicking the Mute button highlighted in the image. |
Unmute the call
 |
Agent can unmute the call by clicking the Unmute button highlighted in the image. |
Blind Transfer
|
|
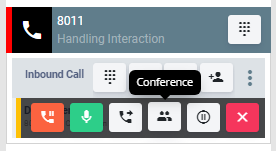
Blind Conference
|
While talking with the customer, agent can make a conference call with another agent. By clicking the Initiate Conference button, the dial pad will open, and agent can dial the number and the call will be conferenced. |
|
 |
Once the conference call is connected, the interaction panel will look as below: 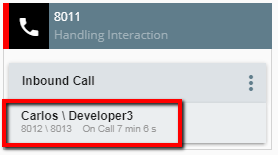 The conference party name and extension will be added into the Conversation section and new timer will be shown which shows duration of the conference call. |
Disconnect the call
 |
|
Secure Pause Recording
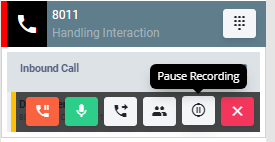 |
If the call is being recorded, the agent can click the Pause Recording button to pause the recording. This is useful when the agent is collecting any sensitive information from the customer, for example, Credit Card information, he can pause the recording to avoid recording the sensitive data. |
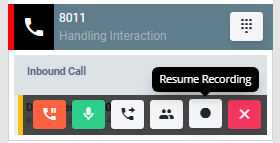 |
After the secure pause recording is started, the recording will be paused for the pre-defined pause time, count down timer will be displayed. At any time during the pause the agent can click Resume Recording button to resume the recording. At the end of the pause timer, the recording will be resumed automatically. |
Consult, Consult Transfer and Consult Conference
Consult is also often known as 2-step conference or 2-step transfer, as it allows you to speak to a second party while the first is on hold, before transferring or conferencing.
Optionally, you can simply consult and then end the consult leg to return to the original caller.
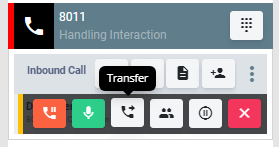
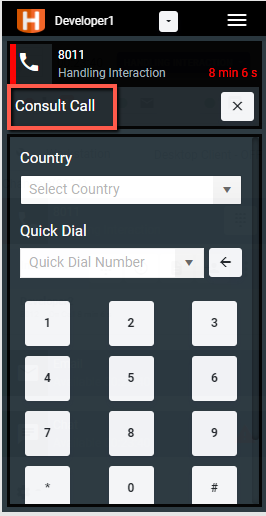
To make a consult call
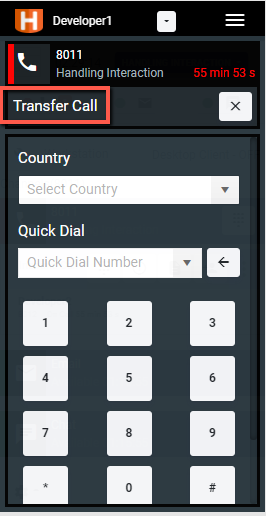
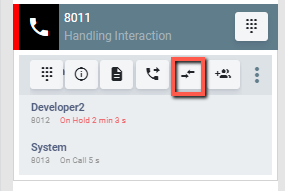
| While talking with the calling party, the agent can make consult call to another agent, by clicking the Consult button as indicated in the image. After clicking the Consult button, a dial pad will be opened, the agent can type number in the text box or click the Quick Dial drop-down box to select a number from the quick dial number list or click number in the dial pad. | 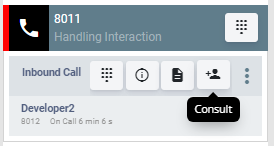 |
 |
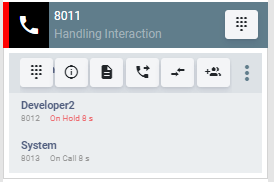
After the consult call is connected. The Consult party conversation will be added to the Interaction panel as shown below. 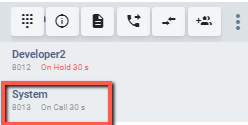 While agent is talking to consult party, hold button in the primary conversation will be changed to Retrieve since the call with customer is on hold as shown in the below image: 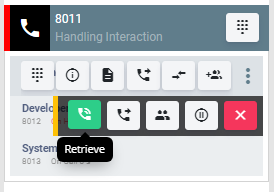
|
To alternate the call (Change speaker)
 |
While talking to consult party, Agent can click the Alternate button to start talking to customer and put the consult party call on hold and vice versa. The below image indicates the agent is talking to customer and consult party is on hold. |
|
The image (right) indicates the agent is talking with Consult party and customer is on hold. |
 |
To make consult Transfer
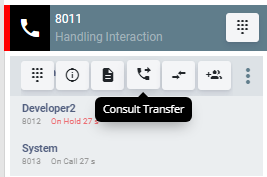 |
During the consult call, agent can transfer the call to consult party by clicking the Transfer to consult call button as shown in the below image. |
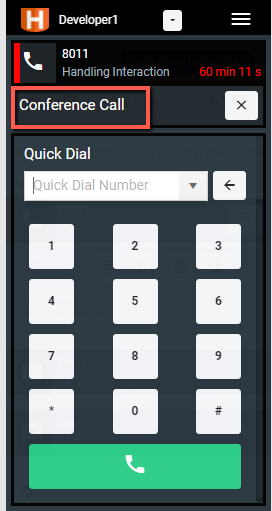
To make consult conference call
 |
|
|
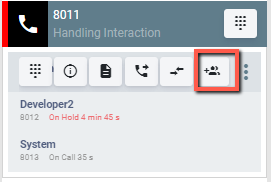
After conference call is connected, then consult conversation is removed from the Interaction Panel and consult party’s name and extension will be added into the Primary conversation. |
 |
Disconnect the consult call
 |
|
View Data
 |
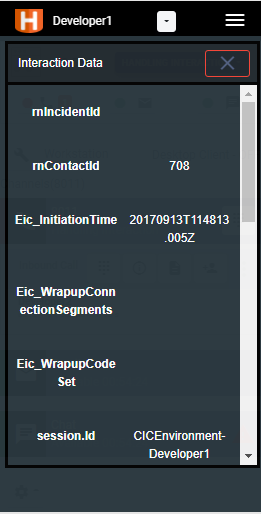
|
Disposition
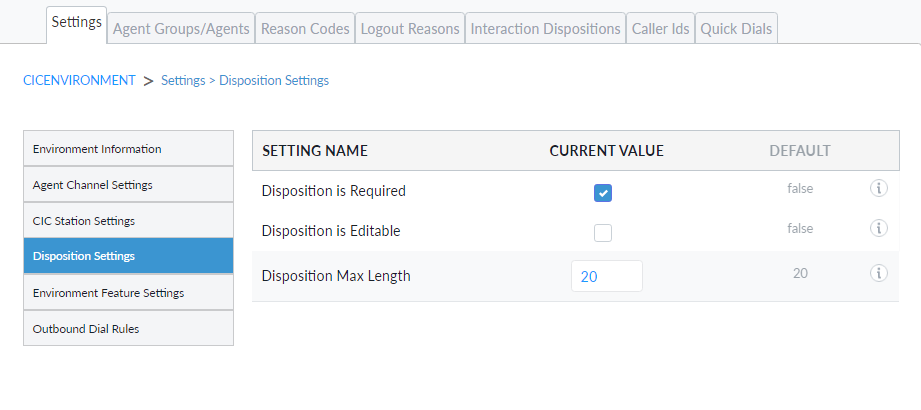
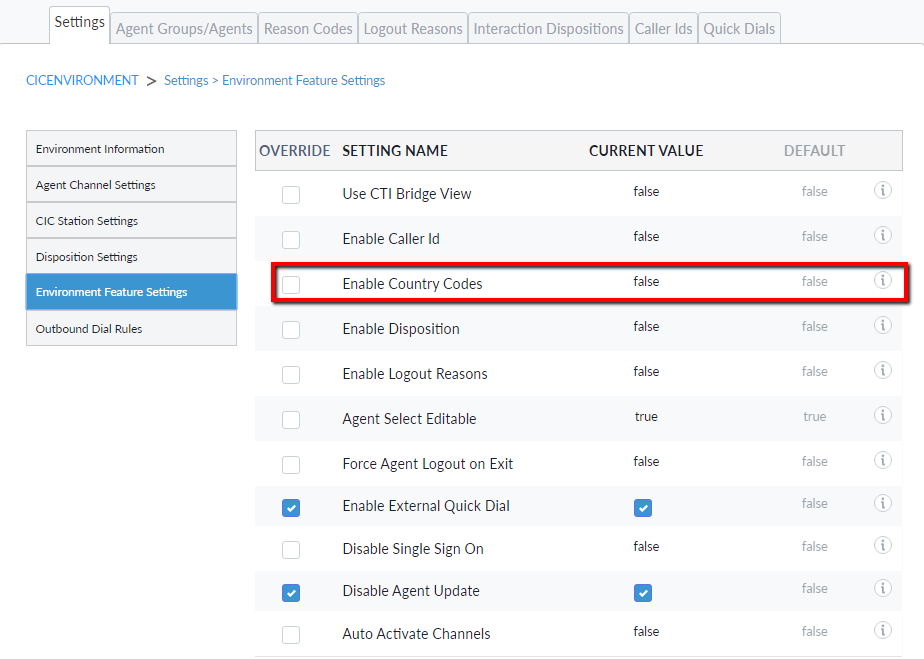
Config server setting –> Environment setting -> Interaction disposition settings
|
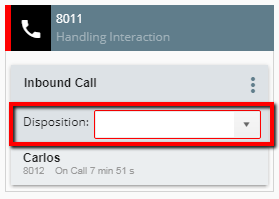
If the Disposition is enabled in the Configuration Server under Environment Feature Settings, Agent can send a disposition by selecting a value from the list presented in the Disposition drop-down list or he can freely enter any value (if ‘Disposition is Editable’ is set to True in the Configuration Server under Interaction Disposition Settings) and hit enter to submit the disposition. |
 |
|
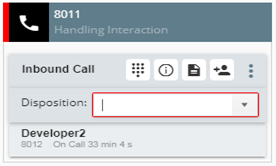
If the disposition is required (if ‘Disposition is Required is set to True in the Configuration Server under Interaction Disposition Settings) and it will have highlighted in red border in the disposition box until he selects a value from the list or type a new value and hit enter. |
 |
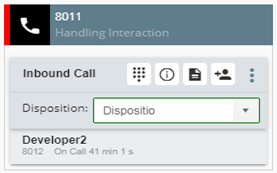 |
After sending the disposition value, the box will have highlighted in green border. If the Interaction is disconnected, whether by the agent or by the calling party, before sending the disposition, agent must submit disposition to complete the Interaction. |
To complete an Interaction
After the call is disconnected, Conversation information will be removed from the Interaction panel and a new checkmark button will be visible. We need to click the checkmark button to complete the interaction.
If ‘End Completes Interaction’ option is enabled in the “Agent Channel Settings” in the Configuration Server, then after disconnecting the call the interaction panel will be removed automatically.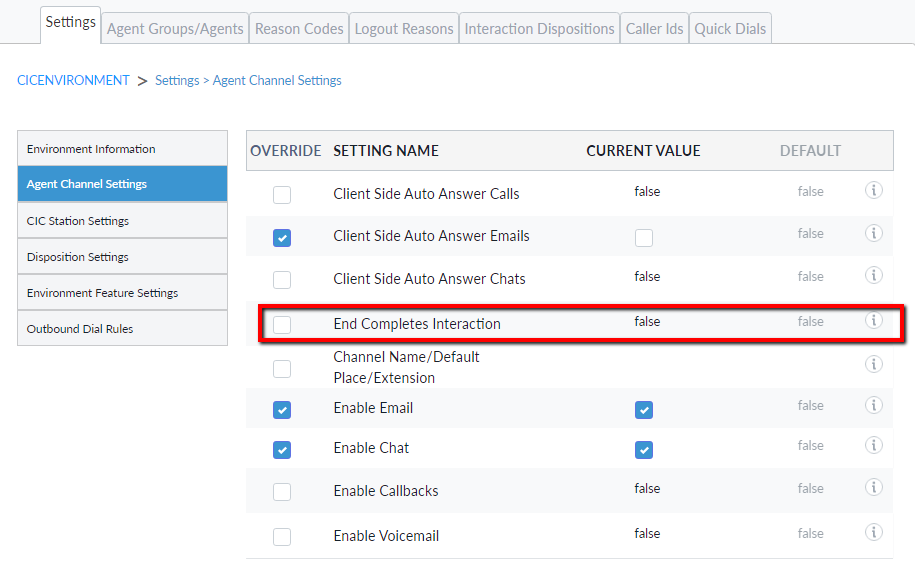
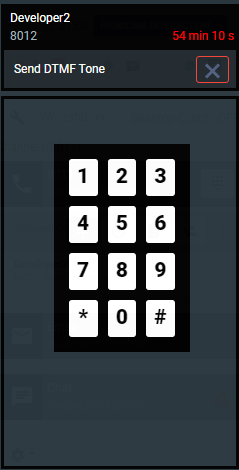
To Send DTMF
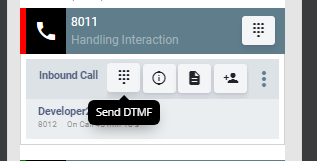 |
During the call at any time if the agent needed to send DTMF signal, he can click the Send DTMF button and click the number in the dial pad.
|
Make an Outbound Call
|
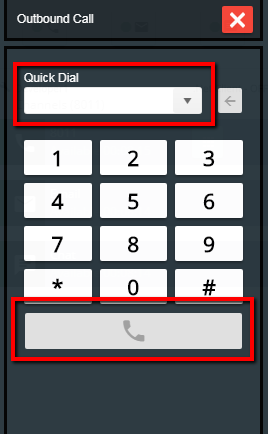
Dialer button is in the Voice channel which allows you to make outbound call. By clicking Dialer Button Dial Pad will be opened and you can enter the destination number to make an outbound call.
|
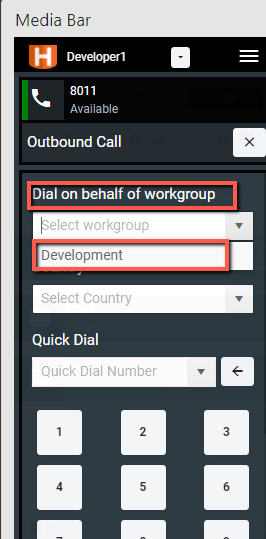
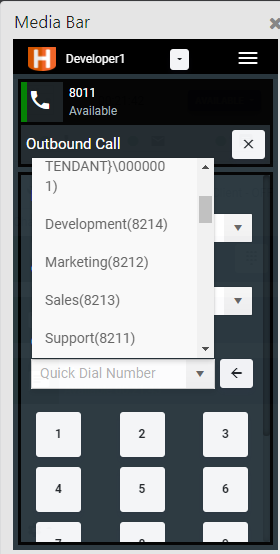
Dial on behalf of the workgroup
|
|
 |
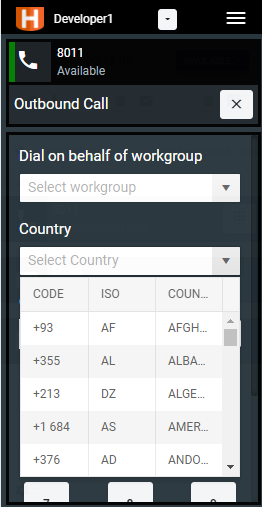
Country Code
Country dropdown only visible when it is enabled from the config server. While making outbound call if agent select the country code the country code prefix appended before the quick dial number. This is an optional field.
 |
 |
Quick Dial List
There are two sets of lists available in the Quick Dial drop-down list.
|
 |
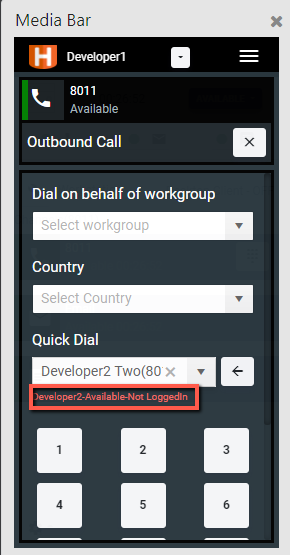
Remote Agent Status
|
When the agent selects the agent name from the quick dial dropdown, he will see agent availability like
|
 |
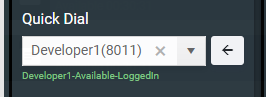 |
And If agent is logged in and available then remote agent status will visible in the green color. |
Outbound Dial Rules
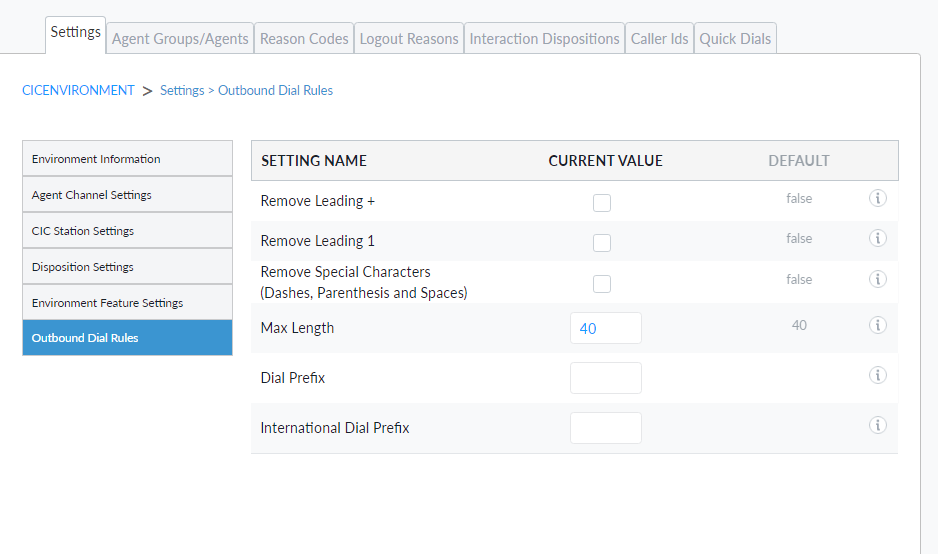
| While dialing number outbound dial rules get applied to the quick dial number if they are enabled from the config server
|
Screen Pop
When the agent receives the new inbound phone call or makes an outbound phone call, the Contact or Incident workspace will be opened, per the rules defined in PopFlow script, in the Oracle Service Cloud as indicated in the below image. Calling party’s caller id will auto-populate in the Phone field.
If the customer information already exists in the Oracle Service Cloud database, then the existing contact information will be populated in the contact details and agent will add new incident or update an existing incident and save it.
If the customer information does not exist in the Oracle Service Cloud database, then a new contact workspace will be opened. The agent can update customer information like first name, last name, etc. and create a new incident, if it is required, and save the contact and incident details.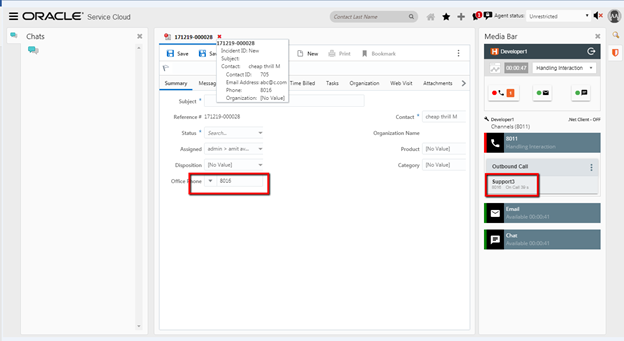
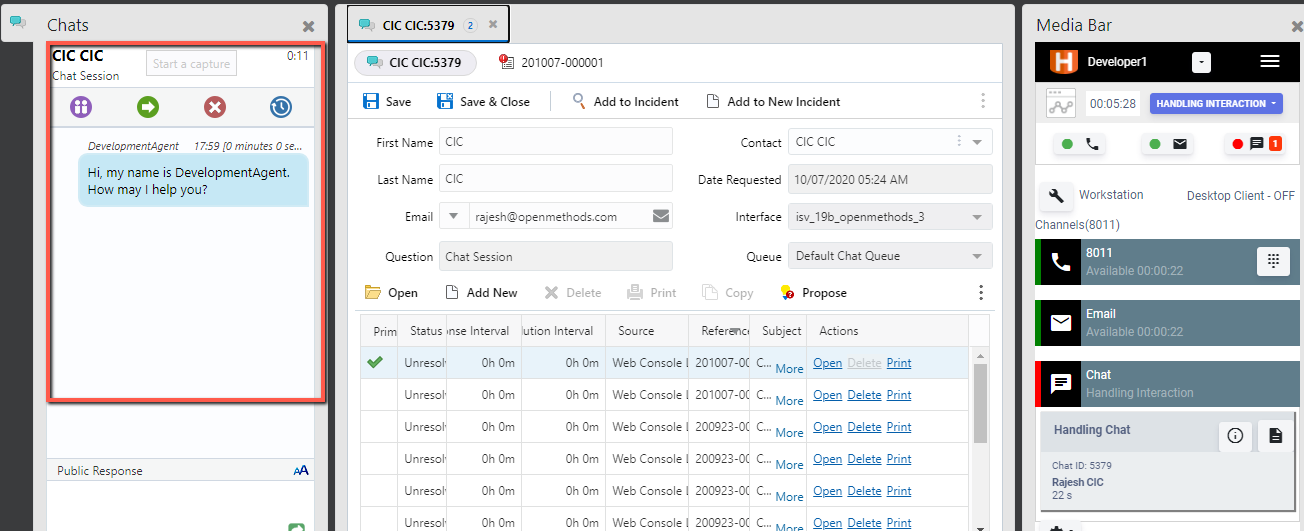
Chat Interactions
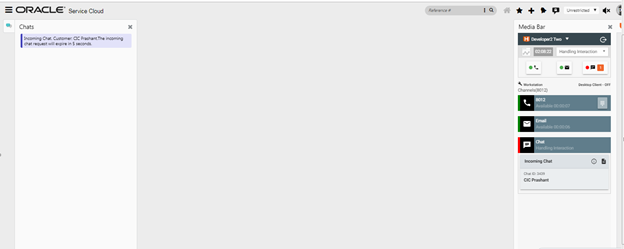
Incoming Chat
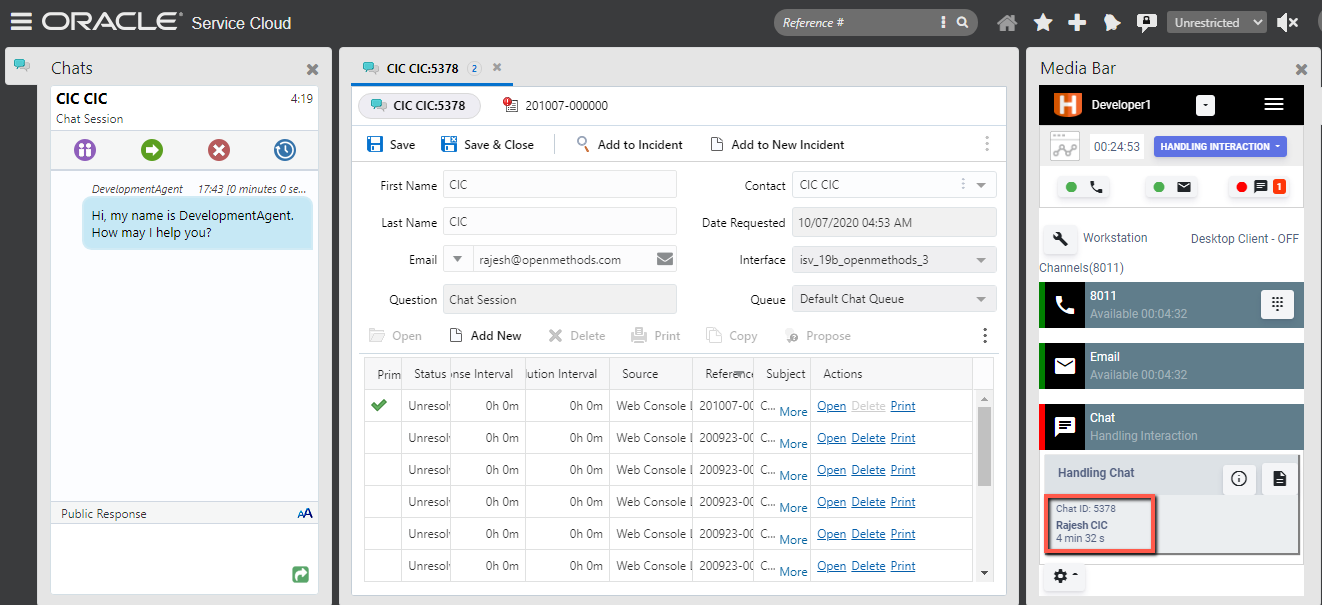
When a new chat arrives, Chat interaction panel will be displayed under the Interactions section with ‘Incoming Chat’ in the Interaction panel header. Agent status and Channel state will be changed to ‘Handling Interaction’. Customer Name is shown in the Interaction Panel.
Pop Chat
After the chat is accepted manually or automatically, Chat workspace will be opened in the Oracle Service Cloud.
Customer information is populated in the Chat window and agent is ready to chat with the customer.
When the chat workspace tab is selected then the respective Chat Interaction Panel is highlighted in light green color, otherwise it will be shown in standard color.
Chat action buttons
There are 6 action buttons associated with chat interaction such as Accept Chat, Complete Interaction, conclude (Wrap-up) Chat, Terminate Chat, View Data and Disposition.
Accept Chat
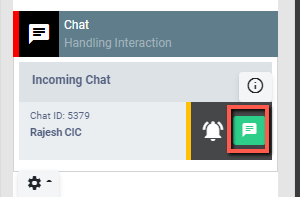 |
The agent can click the Accept button to open Chat. |
Auto Accept
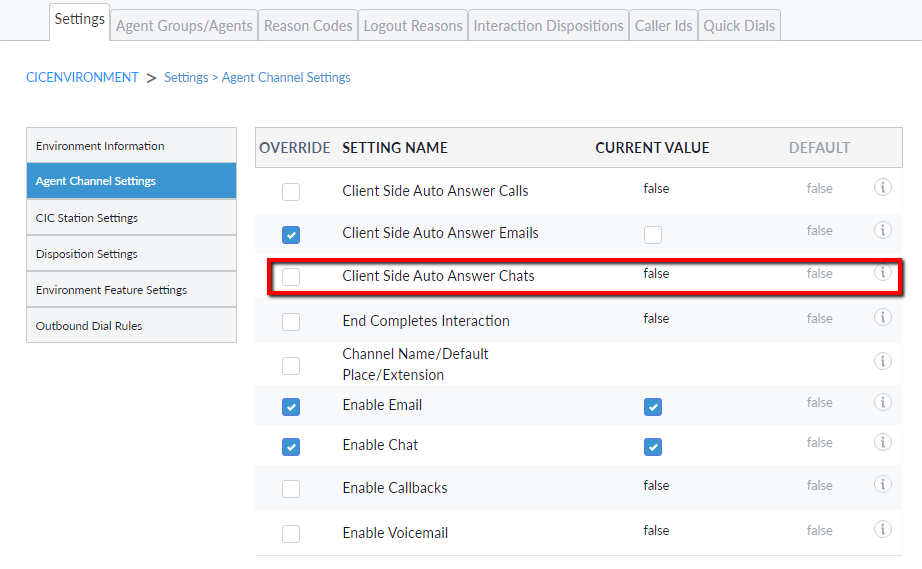
If Client-Side Auto Answer Chats (which is configured in the Environment -> Settings -> Agent Channel Settings in the Configuration Server) is enabled, then chat is auto accepted, and screen pop will open automatically as soon as the chat arrives in the Harmony Media Bar.
Complete Chat Interaction
 |
While you are chatting with the party you cannot click complete checkmark button, We need to terminate the chat from Oracle Service Cloud. Now we are enabling the complete checkmark when agents click on the complete checkmark button, This action removes the Chat interaction panel from the Web Media Bar and your chat channel state will become available and ready to receive the next chat. The chat window in the Oracle Service Cloud will be closed. |
Conclude (Wrap-up) Chat
By clicking the Conclude button, the chat session with the customer will be closed. But the Chat window still open in the Oracle Service Cloud, the agent can continue wrap-up work.
After concluding the chat, a message will be added in the Chat window as highlighted in the below image.
Terminate Chat
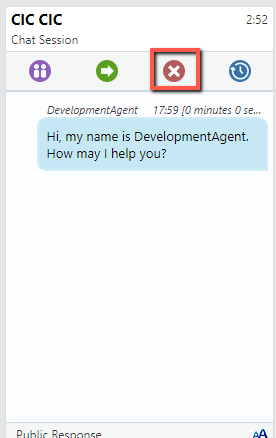 |
You can use this button to terminate the chat. Chat session will be terminated from both the customer and the agent and Oracle Service Cloud Chat window will be closed and Chat Interaction Panel in the Harmony Media Bar will also be removed.
|
View Data
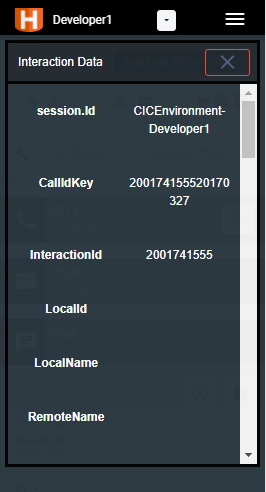 |
|
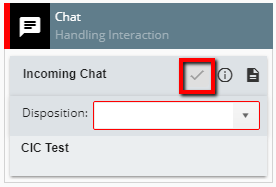
Dispostion
Config server: Environment -> Settings -> Disposition Settings
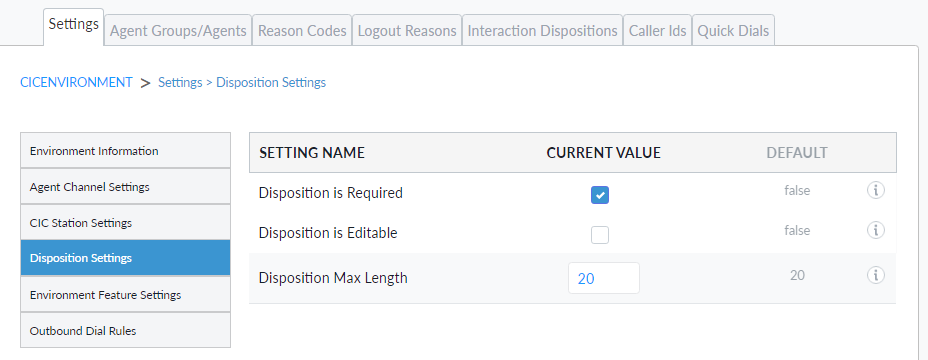
 |
Agent can send a disposition while interaction running or after interaction ends by selecting a value from list presented in the Disposition drop-down list when Disposition is enabled and hit enter to send the value. |
 |
If the disposition is required and it will have highlighted in red border in the disposition box until he selects a value from the list or type a new value and hit enter. |
Email Interactions
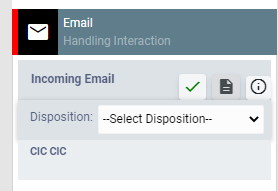
Incoming Email
 |
When the new email arrives, Email interaction panel will be displayed in the Interaction section of the Harmony Media Bar with ‘Incoming Email’ in the header. Agent status and Channel status will be changed to ‘Handling Interaction’. The customer’s email address will be displayed in the Interaction Panel. |
Email screen pop
After the email is accepted manually or automatically, Email Incident will be opened, per the rules defined in Pop Flow script, in the Oracle Service Cloud.
Email action buttons
There are four action buttons associated with an email interaction such as Accept Email, View Data, Disposition and Complete Interaction.
Accept Email
 |
|
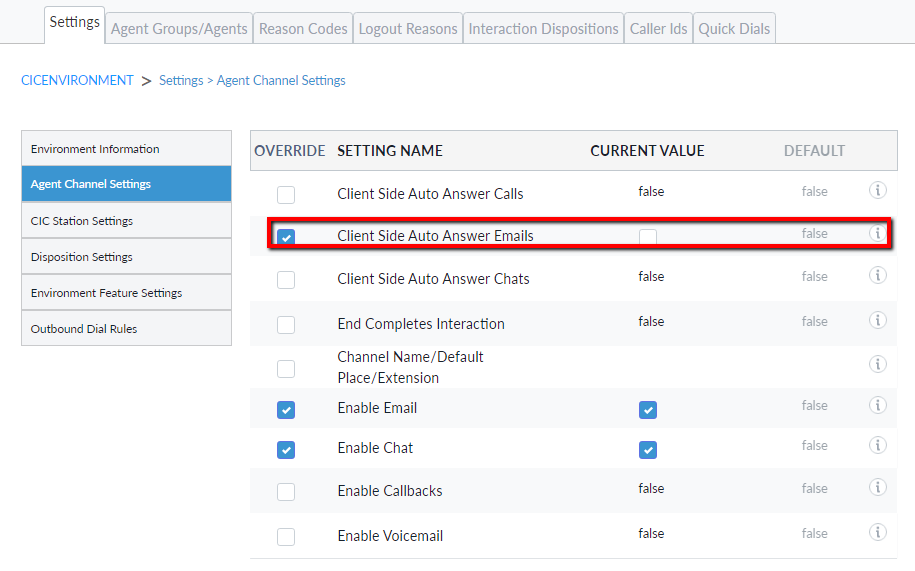
Auto Accept
If the Client-Side Auto Answer Emails (which is configured in the Environment -> Agent Groups/Agents -> Agent Channel Settings in the Configuration Server) is enabled, then email is auto accepted, and screen pop will open automatically as soon as the email arrives in the Harmony Media Bar.
View Data
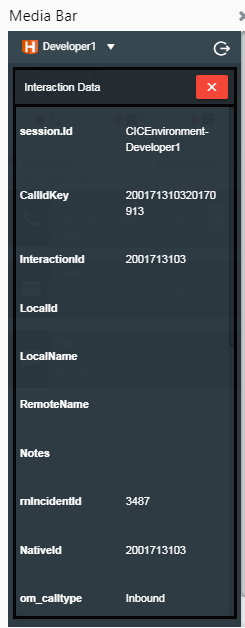 |
|
Disposition
|
Config Server: Environment -> Settings –> Disposition Settings 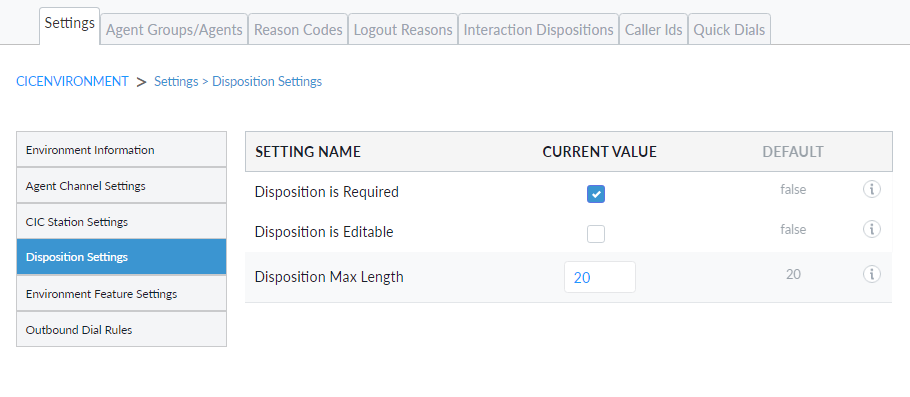
|
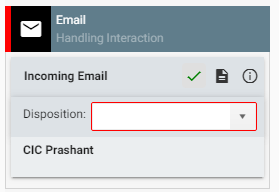 When Disposition is enabled from the config server the button and disposition dropdown will be visible to the agent. If disposition is set to required, the agent needs to enter disposition value, or need to select it from the dropdown list. Until disposition is not selected or value not entered the chat terminate button will be disabled. |
Complete Email Interaction
 |
After accepting an email manually or it is accepted automatically then Complete Interaction button will be displayed. Once you are finished working with email then you can click the button to close out the Email Interaction and ready to receive next email. If you are configured to handle concurrent emails, then you will receive more than one email. By clicking the Complete Email Interaction button will not close the Email workspace in the Oracle Service Cloud, we need to close it manually. |